Are you a musician looking to record your songs in the comfort of your own home? Or maybe you’re an aspiring producer looking to set up a home recording studio? The good news is that with the right equipment and some creativity, you can create a professional-sounding home recording studio. In this guide, we’ll explore the essentials of setting up a home recording studio, from the equipment you’ll need to the tips and tricks for getting the best sound. So, whether you’re a beginner or an experienced musician, read on to discover how you can turn your home into a recording studio.
Yes, you can create a home recording studio! It used to be a daunting task with expensive equipment and soundproofing requirements, but now it’s more accessible than ever. You can start with a basic setup that includes a computer, audio interface, microphone, and headphones. You can then gradually add more equipment and software as your needs and budget grow. Soundproofing your room and treating it with acoustic panels can also greatly improve the quality of your recordings. There are many resources available online to help you learn about home recording and audio production, so you can be well on your way to creating professional-sounding recordings from the comfort of your own home.
Is it Possible to Set Up a Home Recording Studio?
Benefits of Having a Home Recording Studio
Having a home recording studio offers several benefits for musicians, producers, and audio engineers. Here are some of the key advantages of setting up a home recording studio:
- Flexibility: With a home recording studio, you have the flexibility to work on your music projects at any time, day or night. You don’t have to worry about scheduling studio time or paying for expensive studio sessions.
- Cost-Effective: Setting up a home recording studio can be much more cost-effective than renting out a professional studio. You can purchase equipment and software that fits your budget, and you won’t have to pay for studio rental fees or additional costs such as engineer fees.
- Creative Control: Having a home recording studio allows you to have complete creative control over your music projects. You can experiment with different sounds, styles, and techniques without worrying about studio time constraints or input from other people.
- High-Quality Recordings: With the right equipment and software, you can achieve high-quality recordings in your home studio. You can record multiple tracks, edit and mix them, and master your music to a professional standard.
- Learning Opportunities: Setting up a home recording studio provides you with an opportunity to learn about audio engineering, music production, and recording techniques. You can experiment with different equipment and software, and learn about sound design, mixing, and mastering.
Overall, having a home recording studio offers numerous benefits for musicians and audio professionals. It provides flexibility, cost-effectiveness, creative control, high-quality recordings, and learning opportunities. With the right equipment and software, you can create professional-sounding music projects from the comfort of your own home.
Factors to Consider Before Setting Up a Home Recording Studio
When considering setting up a home recording studio, there are several factors to consider. These factors can significantly impact the quality of your recordings and the overall experience of creating music in your home.
First and foremost, you must assess the space you have available in your home. The room you choose for your studio should be as quiet as possible, with minimal outside noise and vibrations. It is also essential to consider the size of the room, as a larger space will provide better acoustics and allow for more instruments and equipment to be placed within it.
Another critical factor to consider is the quality of the equipment you will be using. To achieve professional-sounding recordings, you will need to invest in high-quality microphones, preamps, and other recording equipment. You should also consider the type of software you will be using for recording and mixing, as this can greatly impact the final sound of your recordings.
Additionally, you should think about the level of experience you have with recording and music production. If you are new to recording, it may be helpful to invest in some beginner-friendly equipment and software, or to seek out online tutorials and resources to help you learn the basics.
Finally, you should also consider the cost of setting up a home recording studio. While it is possible to create a high-quality studio on a budget, you will still need to invest in some equipment and software, which can add up quickly. It is important to set a budget and prioritize the equipment and software that will have the most significant impact on the quality of your recordings.
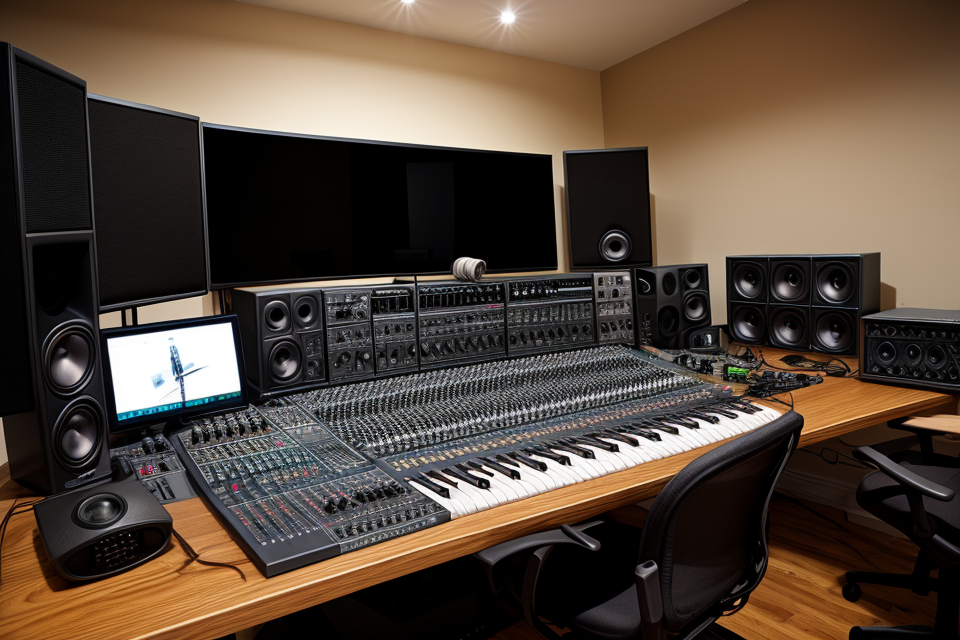
Choosing the Right Equipment for Your Home Recording Studio
Essential Equipment for a Home Recording Studio
Creating a home recording studio requires a significant investment in equipment. To get started, you’ll need to purchase some essential items that will form the backbone of your setup. These include:
- Computer or Laptop: You’ll need a computer or laptop with enough processing power to handle audio recording and editing software. A computer with at least 8GB of RAM and a dual-core processor will be sufficient for basic recording tasks.
- Digital Audio Workstation (DAW) Software: A DAW is software that allows you to record, edit, and mix audio. Popular options include Pro Tools, Ableton Live, and Logic Pro X. Choose a DAW that you’re comfortable with and that offers the features you need for your specific recording needs.
- Microphone: A high-quality microphone is essential for capturing clear and accurate audio. There are many types of microphones to choose from, including condenser, dynamic, and ribbon microphones. For beginners, a large-diaphragm condenser microphone is a good choice.
- Audio Interface: An audio interface is a device that connects your microphone and other audio equipment to your computer. It converts analog audio signals into digital signals that your computer can understand. Look for an audio interface with at least two input channels to accommodate multiple microphones or instruments.
- Headphones: A good pair of headphones is crucial for monitoring your recordings and making adjustments as you go. Over-ear headphones with a closed-back design will provide better isolation and reduce outside noise.
- Acoustic Treatment: Good acoustics are essential for a professional-sounding recording. Invest in some acoustic foam or panels to help absorb unwanted sounds and reflections.
By investing in these essential pieces of equipment, you’ll be well on your way to creating a high-quality home recording studio.
Recommended Software for Home Recording Studios
Choosing the right software for your home recording studio is an essential part of setting up your equipment. The software you choose will dictate the quality of your recordings and the tools you have at your disposal. Here are some recommended software options for home recording studios:
1. Ableton Live
Ableton Live is a popular choice for many home recording artists. It offers a wide range of features, including live performance capabilities, a range of audio and MIDI effects, and the ability to work with a variety of instruments and equipment.
2. Pro Tools
Pro Tools is a professional-grade digital audio workstation (DAW) that is widely used in the music industry. It offers a range of advanced features, including a high-quality audio engine, advanced editing tools, and support for a wide range of hardware and software instruments.
3. Logic Pro
Logic Pro is another popular choice for home recording artists. It offers a range of advanced features, including a professional-grade audio engine, advanced MIDI editing tools, and support for a wide range of hardware and software instruments.
4. FL Studio
FL Studio is a powerful and versatile DAW that is suitable for a wide range of music production styles. It offers a range of advanced features, including a high-quality audio engine, advanced MIDI editing tools, and support for a wide range of hardware and software instruments.
5. Reaper
Reaper is a versatile and affordable DAW that is suitable for a wide range of music production styles. It offers a range of advanced features, including a high-quality audio engine, advanced MIDI editing tools, and support for a wide range of hardware and software instruments.
It’s important to note that these are just a few examples of the many software options available for home recording studios. The best software for you will depend on your specific needs and preferences, so it’s important to do your research and try out different options before making a final decision.
Designing Your Home Recording Studio
Room Treatment and Acoustics
When it comes to designing a home recording studio, one of the most important factors to consider is room treatment and acoustics. The sound quality of your recordings will largely depend on the acoustic properties of the room you choose to record in.
Understanding Room Acoustics
Room acoustics refer to the way sound behaves within a room. The shape, size, and materials used in constructing a room can all affect the way sound is reflected, absorbed, and reverberated. A room with poor acoustics will result in poor sound quality, while a room with good acoustics will enhance the quality of your recordings.
Importance of Room Treatment
Room treatment refers to the use of sound-absorbing materials and design elements to improve the acoustics of a room. This can include adding acoustic panels to walls and ceilings, installing bass traps, and using diffusers to scatter sound waves.
By treating your room, you can control the amount of sound reflection and reverberation, which will result in a more controlled and balanced sound. This is especially important when recording instruments such as guitars and pianos, where the natural reverb of the room can greatly affect the tone and quality of the recording.
Tips for Room Treatment
When it comes to treating your room, there are a few key things to keep in mind:
- Start with a room that has good acoustics to begin with. A small, square room with parallel walls will typically have the best acoustics for recording.
- Use acoustic panels to absorb sound waves and reduce reflection and reverberation. These can be placed on walls, ceilings, and even on the floor.
- Install bass traps to control low-frequency sounds. These can be especially useful if you’re recording bass or other low-end instruments.
- Use diffusers to scatter sound waves and reduce echo and reverberation. These can be placed on walls or ceilings.
- Experiment with different setups and configurations to find what works best for your specific room and recording needs.
By taking the time to properly treat your room, you can greatly improve the quality of your home recordings and create a professional-sounding studio.
Setting Up Your Workspace
When it comes to setting up your home recording studio, there are a few key factors to consider. First and foremost, you’ll need to choose a space in your home that is dedicated to recording. This can be a spare room, a closet, or even a corner of a larger room. Ideally, this space should be as quiet as possible with minimal outside noise.
Once you’ve chosen your space, it’s time to start thinking about the equipment you’ll need. This will include things like a computer or laptop with recording software, a microphone, and headphones. It’s important to research and invest in quality equipment that will provide the best possible sound quality.
Another important aspect of setting up your workspace is arranging it in a way that is ergonomic and comfortable. This may mean investing in a good chair, desk, or standing desk, as well as ensuring that your equipment is easily accessible and organized in a way that makes sense for your workflow.
In addition to the physical setup of your workspace, it’s also important to consider the acoustics of the room. This can be achieved through the use of soundproofing materials, as well as strategically placing furniture and other objects in the room to absorb or reflect sound.
Overall, setting up your workspace is a crucial step in creating a successful home recording studio. By taking the time to carefully consider your equipment, ergonomics, and acoustics, you’ll be well on your way to recording high-quality audio in the comfort of your own home.
Recording and Producing Music in Your Home Studio
Recording Vocals and Instruments
Creating a home recording studio opens up a world of possibilities for musicians, allowing them to produce and record their music from the comfort of their own home. Recording vocals and instruments is a crucial aspect of the music production process, and it’s essential to have the right equipment and knowledge to achieve professional-sounding results. In this section, we’ll discuss the necessary components for recording vocals and instruments in a home recording studio.
One of the most important factors in recording vocals is selecting the right microphone. There are various types of microphones available, each with its own unique characteristics and features. Some popular options for recording vocals include dynamic microphones, condenser microphones, and ribbon microphones. Dynamic microphones are known for their durability and ability to handle high volumes, making them a great choice for live performances. Condenser microphones, on the other hand, are sensitive and capture a wide range of frequencies, making them ideal for studio recordings. Ribbon microphones are known for their warm and natural sound, making them a popular choice for recording vocals.
In addition to selecting the right microphone, it’s important to have a good microphone preamp and audio interface. A microphone preamp helps to boost the signal from the microphone and provide some basic EQ and compression. An audio interface, on the other hand, is responsible for converting the analog signal from the microphone into a digital signal that can be recorded into a computer. A high-quality audio interface will ensure that the recorded signal is clean and free of noise.
For recording instruments, such as guitars and drums, it’s important to have the right equipment and know how to use it effectively. For example, when recording guitars, it’s important to use a direct box to remove any unwanted noise from the instrument and capture a clean signal. When recording drums, it’s important to use a combination of microphones and DI (direct injection) boxes to capture the individual drum sounds and the overall kit sound.
Finally, it’s important to have a good digital audio workstation (DAW) to record, edit, and mix the recorded tracks. A DAW allows for precise editing and mixing, making it possible to fine-tune the recorded tracks and achieve professional-sounding results. Some popular DAWs include Ableton Live, Logic Pro, and Pro Tools.
In conclusion, recording vocals and instruments in a home recording studio requires the right equipment and knowledge. Selecting the right microphone, microphone preamp, audio interface, and DAW is crucial for achieving professional-sounding results. With the right equipment and some practice, it’s possible to create high-quality recordings from the comfort of your own home.
Mixing and Mastering Your Recordings
Mixing and mastering are crucial steps in the process of creating a polished and professional-sounding recording. In this section, we will discuss the techniques and tools you can use to achieve a high-quality mix and master your recordings.
Mixing
Mixing is the process of combining the different tracks of your recording to create a cohesive and balanced mix. There are several techniques you can use to achieve a good mix, including:
- EQ: Adjusting the equalization of each track to remove unwanted frequencies and enhance the desired ones.
- Compression: Using compression to control the dynamics of each track and make them sit better in the mix.
- Panning: Adjusting the position of each track in the stereo field to create a sense of space and depth.
- Reverb: Adding ambiance and depth to your tracks using reverb.
- Delay: Adding space and depth to your tracks using delay.
It’s important to note that mixing is a subjective process, and what sounds good to one person may not sound good to another. The key is to experiment and find the sound that works best for your music.
Mastering
Mastering is the process of finalizing the overall sound of your recording. This includes adjusting the volume levels, adding compression, and enhancing the overall sonic character of your music.
There are several tools you can use to master your recordings, including:
- Mastering EQ: Adjusting the equalization of your entire mix to enhance the overall sonic character.
- Compression: Using compression to control the overall dynamics of your mix and make it sit better on different playback systems.
- Limiting: Adjusting the volume levels of your mix to ensure that it stays within a consistent volume range.
- Stereo Enhancer: Adding depth and width to your mix using stereo enhancement techniques.
It’s important to note that mastering is also a subjective process, and what sounds good to one person may not sound good to another. The key is to experiment and find the sound that works best for your music.
In conclusion, mixing and mastering are crucial steps in the process of creating a polished and professional-sounding recording. By using the techniques and tools discussed in this section, you can achieve a high-quality mix and master your recordings.
Overcoming Challenges in a Home Recording Studio
Dealing with Limited Space
When it comes to creating a home recording studio, one of the biggest challenges you may face is dealing with limited space. It can be difficult to set up all the equipment and instruments you need without taking up too much room in your home. However, with a little creativity and careful planning, it is possible to create a functional and effective home recording studio even in a small space.
One of the keys to dealing with limited space is to be selective about the equipment you choose. You may need to invest in some high-quality, compact equipment that can help you get the sound you want without taking up too much room. For example, you may want to consider purchasing a digital audio workstation (DAW) that can serve as the centerpiece of your recording setup. A DAW allows you to record, edit, and mix your tracks all in one place, and many of them are designed to be lightweight and easy to transport.
Another important consideration when dealing with limited space is to be mindful of the layout of your recording studio. You may need to get creative with how you arrange your equipment and instruments in order to make the most of the space you have. For example, you may want to consider investing in a portable recording booth or screen that can be used to create a separate recording area within your studio. This can help you to minimize noise and distractions, and can also help to keep your equipment organized and easy to access.
In addition to being selective about your equipment and mindful of your layout, it can also be helpful to invest in some high-quality acoustic treatment for your recording studio. This can help to reduce the amount of echo and reverberation in your space, which can be particularly helpful if you are working in a small room. There are a variety of different acoustic treatments you can use, including soundproofing materials, absorption panels, and diffusers. By carefully selecting and placing these treatments, you can help to create a more pleasant and productive recording environment.
Overall, while dealing with limited space can be a challenge when creating a home recording studio, it is possible to overcome this obstacle with careful planning and selection. By being selective about your equipment, mindful of your layout, and investing in high-quality acoustic treatment, you can create a functional and effective recording studio even in a small space.
Managing Noise and Soundproofing
Managing noise and soundproofing is a crucial aspect of creating a home recording studio. Excessive noise from outside or inside the building can significantly affect the quality of your recordings. In this section, we will discuss various techniques and strategies for managing noise and soundproofing your home recording studio.
Ideal Room Characteristics
Before discussing soundproofing techniques, it is essential to understand the ideal characteristics of a room for recording purposes. A good recording room should have:
- Minimal noise from outside sources
- Minimal reverberation and echo
- A consistent and even frequency response
- Good isolation from adjacent rooms
Creating an ideal room may not be possible in all situations, but understanding these characteristics can help you identify potential issues and make the best of what you have.
Soundproofing Techniques
Soundproofing your home recording studio involves using various techniques to minimize noise transfer and reverberation. Here are some common methods:
1. Dampening and Absorption
Dampening and absorption are essential for controlling reverberation and echo in a recording room. Materials like acoustic foam, mass-loaded vinyl, and fibreglass can be used to line walls, ceilings, and floors. These materials absorb sound waves and help to reduce the overall volume of the room.
2. Soundproofing Curtains
Soundproofing curtains are an affordable and effective way to block out external noise. These curtains are typically made of thick, dense material that helps to dampen sound waves. They can be hung on windows or placed across doorways to create a barrier between your recording space and the rest of the house.
3. Door Seals and Weatherstripping
Door seals and weatherstripping can help to minimize noise transfer between rooms. For example, installing a door draft stopper can create a tight seal around the edges of a door, preventing sound from leaking through. Additionally, weatherstripping can be applied to doors and windows to further enhance their soundproofing capabilities.
4. Room within a Room
Constructing a room within a room, also known as a “room-in-a-room” technique, can provide an additional layer of soundproofing. This involves constructing an inner room with a separate door, effectively creating a smaller, more controlled environment for recording.
Noise Generating Sources
In addition to managing external noise, it is also essential to consider noise generated within the building. Common sources of noise include:
- HVAC systems
- Appliances
- Footsteps
- Neighboring rooms
To minimize noise from these sources, consider the following:
- Installing noise-reducing HVAC systems
- Moving appliances to a different location
- Using noise-absorbing materials underfoot
- Sealing gaps and cracks in walls and floors
By addressing both external and internal noise sources, you can create a more controlled and comfortable environment for your home recording studio.
Tips for Improving Your Home Recording Studio
Upgrading Your Equipment
When it comes to upgrading your home recording studio, there are a few key pieces of equipment that you should consider investing in. These include:
- Microphones: One of the most important pieces of equipment for any home recording studio is a good microphone. There are many different types of microphones to choose from, including condenser microphones, dynamic microphones, and ribbon microphones. It’s important to choose a microphone that is well-suited to your recording needs and budget.
- Audio Interface: An audio interface is a device that allows you to connect your microphones and other audio equipment to your computer. It’s important to choose an audio interface that has a high-quality preamp and plenty of input and output options.
- Digital Audio Workstation (DAW): A DAW is a software program that allows you to record, edit, and mix audio. There are many different DAWs to choose from, including Pro Tools, Logic Pro, and Ableton Live. It’s important to choose a DAW that is well-suited to your recording needs and budget.
- Headphones: Headphones are an essential piece of equipment for any home recording studio. They allow you to monitor your recordings and hear what you’re doing in real-time. It’s important to choose a pair of headphones that is well-suited to your recording needs and budget.
- Acoustic Treatment: Acoustic treatment is important for controlling the sound in your home recording studio. This can include items like soundproofing materials, bass traps, and diffusers. It’s important to choose acoustic treatment that is well-suited to your recording needs and budget.
By upgrading your equipment, you can improve the quality of your recordings and make your home recording studio a more professional and efficient space.
Investing in Acoustic Treatment
When it comes to creating a home recording studio, investing in acoustic treatment is one of the most important steps you can take to improve the quality of your recordings. The right acoustic treatment can help reduce echo, reverb, and other unwanted sounds that can interfere with your recordings. Here are some tips for investing in acoustic treatment for your home recording studio:
Identifying Sound Issues
The first step in investing in acoustic treatment for your home recording studio is to identify the sound issues you are experiencing. This can include echo, reverb, and other unwanted sounds that can interfere with your recordings. To identify these issues, you can listen to your recordings and pay attention to any unwanted sounds that may be present. You can also use tools such as a sound level meter or a spectral analyzer to help identify specific sound issues.
Types of Acoustic Treatment
There are several types of acoustic treatment that you can invest in for your home recording studio. These include:
- Absorption panels: These panels are designed to absorb sound waves and reduce echo and reverb.
- Diffusion panels: These panels are designed to scatter sound waves and reduce unwanted reflections.
- Bass traps: These panels are designed to reduce low-frequency sounds such as bass and rumble.
- Reflection filters: These filters are designed to reduce unwanted reflections and improve the clarity of your recordings.
Budget
When investing in acoustic treatment for your home recording studio, it’s important to consider your budget. There are many different options available at various price points, so it’s important to find the right balance between quality and affordability. You may also want to consider investing in a combination of different types of acoustic treatment to address a range of sound issues.
Installation
Once you have identified the sound issues you are experiencing and have selected the right acoustic treatment for your home recording studio, it’s time to install it. This may involve hanging absorption panels on the walls, placing diffusion panels in strategic locations, or installing bass traps in the corners of the room. It’s important to install the acoustic treatment carefully to ensure that it is effective and does not interfere with the aesthetics of your recording space.
Overall, investing in acoustic treatment is a crucial step in creating a high-quality home recording studio. By identifying sound issues, selecting the right types of acoustic treatment, considering your budget, and properly installing the treatment, you can significantly improve the quality of your recordings and take your home recording studio to the next level.
Experimenting with Different Setups
One of the key components to creating a successful home recording studio is experimenting with different setups. Here are some tips to help you get started:
- Invest in quality equipment: While it may be tempting to try to save money by purchasing low-cost equipment, investing in quality equipment will pay off in the long run. Consider purchasing equipment from reputable brands that are known for their quality and durability.
- Consider your space: The layout of your recording space can have a significant impact on the quality of your recordings. Consider the size of the room, the placement of windows and doors, and the materials used in the construction of the room. If possible, try to create a room within a room to help isolate sound.
- Experiment with microphone placement: The placement of microphones can greatly affect the quality of your recordings. Try different microphone placements to find the one that works best for your specific setup. Experiment with different distances from the sound source, angles, and polar patterns.
- Try different software: There are many different digital audio workstations (DAWs) available, each with its own unique features and capabilities. Try out different software to find the one that works best for your needs. Consider factors such as ease of use, available plugins, and compatibility with your equipment.
- Collaborate with others: Collaborating with other musicians and engineers can help you learn new techniques and gain new perspectives on your recordings. Consider joining online forums or social media groups dedicated to home recording to connect with other like-minded individuals.
By experimenting with different setups, you can find the combination of equipment, software, and techniques that work best for your specific needs and preferences. Remember to be patient and keep an open mind, as experimentation is a crucial part of the process of creating a successful home recording studio.
Future Advancements in Home Recording Technology
The world of home recording technology is constantly evolving, and there are several exciting advancements on the horizon that could greatly enhance your home recording studio. Here are some of the most promising developments to keep an eye on:
- Artificial Intelligence (AI) and Machine Learning (ML): AI and ML are already being used in a variety of applications in the music industry, from generating new sounds to improving audio quality. In the future, these technologies could be used to automate many of the tedious tasks involved in recording and mixing, such as EQing and compression. This could free up more time for creativity and allow for more efficient workflows.
- Virtual Reality (VR) and Augmented Reality (AR): VR and AR technologies have the potential to revolutionize the way we record and produce music. Imagine being able to step inside a virtual studio and manipulate sounds and instruments in real-time, or using AR to visualize and edit complex mixes. These technologies are still in their infancy, but they could offer exciting new possibilities for home recording studios in the future.
- Advanced Analog Modeling: While digital recording technology has come a long way in recent years, many musicians and engineers still prefer the warm, analog sound of classic recording equipment. Advanced analog modeling technology could allow for more realistic emulations of classic analog gear, making it possible to achieve the same sounds without the need for expensive, vintage hardware.
- Cloud-Based Collaboration Tools: With the rise of remote work and collaboration, cloud-based collaboration tools are becoming increasingly important for musicians and producers. In the future, we can expect to see more advanced tools that make it easier to collaborate with other musicians and producers from anywhere in the world. This could include real-time collaboration features, as well as more sophisticated ways of sharing and reviewing work.
- Improved Microphone Technology: Microphones are one of the most important pieces of equipment in any home recording studio, and there are several new technologies on the horizon that could greatly improve their performance. For example, new types of microphone capsules and diaphragms could offer better frequency response and transient response, while improved digital signal processing (DSP) could make it easier to correct common issues like phase cancellation and proximity effect.
By keeping an eye on these future advancements in home recording technology, you can stay ahead of the curve and make sure that your home recording studio is always up-to-date with the latest and greatest tools and techniques.
FAQs
1. What equipment do I need to create a home recording studio?
Answer: Creating a home recording studio requires some essential equipment such as a computer or laptop, audio interface, microphone, headphones, and acoustic treatment materials like soundproofing foam or blankets. Additionally, you may need some cables, microphone stands, and a MIDI controller to get started. It’s important to invest in quality equipment to ensure that you get the best possible sound quality.
2. How much does it cost to set up a home recording studio?
Answer: The cost of setting up a home recording studio can vary greatly depending on the quality of equipment you choose and your budget. You can start with a basic setup that includes a USB audio interface and a pair of headphones for around $100. However, if you want to create a professional-grade studio, you may need to invest in higher-end equipment that can cost thousands of dollars. It’s important to set a budget and prioritize the equipment that will have the most significant impact on your recordings.
3. What are the benefits of having a home recording studio?
Answer: Having a home recording studio offers many benefits, including the ability to record and produce music at any time, without the need for a professional studio. You can also experiment with different sounds and styles without worrying about the cost of studio time. Additionally, having a home recording studio allows you to have complete control over your recordings, from start to finish. This can help you develop your skills as a producer and improve your overall sound quality.
4. How do I set up my home recording studio?
Answer: Setting up your home recording studio involves several steps, including choosing the right equipment, setting up your workspace, and configuring your software. It’s important to start by choosing the right audio interface and microphone for your needs, and then setting up your workspace with acoustic treatment materials to minimize noise and reflections. Once you have your equipment set up, you can configure your software to get started recording and producing your music.
5. Can I create a professional-quality recording in a home studio?
Answer: While it may be more challenging to create a professional-quality recording in a home studio compared to a professional studio, it is certainly possible. With the right equipment and techniques, you can achieve high-quality recordings that rival those made in a professional studio. The key is to invest in quality equipment, take the time to set up your workspace properly, and use the right software and techniques to get the best possible sound quality.
