Setting up a professional recording studio can be a daunting task, especially when you’re on a budget. However, with the right approach and some creative problem-solving, it’s possible to create a high-quality recording space without breaking the bank. In this article, we’ll explore some cost-effective solutions for setting up a professional recording studio, from choosing the right equipment to optimizing your space for optimal sound quality. Whether you’re a beginner or an experienced music producer, this guide will provide you with the tools and tips you need to create a world-class recording studio on a budget. So, let’s get started!
Planning Your Studio Setup
Identifying Your Needs
Types of Recording Studios
When it comes to setting up a recording studio, there are three main types to consider: home recording studios, commercial recording studios, and hybrid recording studios.
Home Recording Studio
A home recording studio is ideal for musicians who want to record their music in the comfort of their own home. This type of studio setup typically includes a computer-based digital audio workstation (DAW) and a microphone. Home recording studios are usually more cost-effective than commercial or hybrid studios, but they may not have the same level of professional equipment.
Commercial Recording Studio
Commercial recording studios are professional facilities that are designed specifically for recording music. These studios often have high-end equipment and experienced engineers who can help musicians achieve the best possible sound. Commercial studios can be expensive, but they offer a level of quality and expertise that may be difficult to achieve at home.
Hybrid Recording Studio
A hybrid recording studio is a combination of a home and commercial studio. This type of setup allows musicians to record at home and then finish their tracks at a commercial studio. Hybrid studios can be a good option for musicians who want the convenience of a home studio but also want access to professional equipment and expertise.
Your Budget
Determining your budget is a crucial step in setting up a professional recording studio on a budget. Before you start purchasing equipment, you need to determine how much you can afford to spend. Consider your financial situation, your income, and your expenses to determine your budget.
Once you have determined your budget, it’s time to prioritize your spending. Identify the equipment that is essential for your recording studio and prioritize those items in your budget. You may need to make some sacrifices and cut back on non-essential items to stay within your budget.
In conclusion, identifying your needs is an important step in setting up a professional recording studio on a budget. By considering the type of studio setup that works best for you, determining your budget, and prioritizing your spending, you can create a professional recording studio that meets your needs without breaking the bank.
Choosing Your Gear
Choosing the right gear is crucial for setting up a professional recording studio on a budget. The gear you choose will have a significant impact on the quality of your recordings. Here are some essential recording equipment that you should consider when setting up your studio:
Essential Recording Equipment
- Microphone: A good quality microphone is the backbone of any recording studio. It is important to choose a microphone that is suitable for your recording needs. Some popular options include condenser microphones, dynamic microphones, and ribbon microphones.
- Audio Interface: An audio interface is used to connect your microphone and other recording equipment to your computer. It converts analog signals to digital signals and allows you to record high-quality audio.
- Headphones: A good pair of headphones is essential for monitoring your recordings. Over-ear headphones are preferred as they provide better sound isolation and comfort.
- Preamplifier: A preamplifier is used to boost the signal from your microphone before it reaches your audio interface. It can also add warmth and character to your recordings.
- Digital Audio Workstation (DAW): A DAW is software that allows you to record, edit, and mix your audio. Popular DAWs include Ableton Live, Logic Pro, and Pro Tools.
Other Equipment
- Cables and Connectors: High-quality cables and connectors are essential for ensuring that your gear is connected correctly and providing the best possible sound quality.
- Acoustic Treatment: Acoustic treatment includes items such as soundproofing materials, acoustic panels, and bass traps. These are used to control and absorb sound reflections in your recording space, which can significantly improve the quality of your recordings.
Researching and Comparing Products
When choosing your gear, it is important to do your research and compare different products. Online reviews can provide valuable insights into the performance and quality of different gear. It is also helpful to seek out expert opinions from experienced recording engineers and producers. Additionally, user manuals and technical specifications can provide detailed information about the gear’s features and capabilities.
Setting Up Your Studio Space
Acoustic Treatment
Understanding Acoustics
The first step in setting up a professional recording studio on a budget is to understand the basics of acoustics. Acoustics refer to the study of how sound behaves in an environment. The acoustic properties of a room can greatly affect the quality of the recorded sound.
Sound Absorption
Sound absorption is the process of reducing the amount of sound energy in a room. This is achieved by adding materials that absorb sound waves, such as foam or acoustic panels. The goal is to reduce the amount of echo and reverberation in the room, which can improve the clarity and quality of the recorded sound.
Sound Diffusion
Sound diffusion is the process of spreading sound waves evenly throughout a room. This is achieved by adding materials that scatter sound waves, such as bass traps or curtains. The goal is to reduce the amount of sound reflection and increase the amount of sound absorption, which can improve the clarity and quality of the recorded sound.
Sound Reflection
Sound reflection is the process of sound waves bouncing off of surfaces in a room. This can cause echo and reverberation, which can negatively affect the quality of the recorded sound. To reduce sound reflection, it is important to add materials that absorb or scatter sound waves.
Acoustic Treatment Materials
There are several types of materials that can be used for acoustic treatment in a recording studio. These include:
Foam
Foam is a popular choice for sound absorption. It is affordable and easy to install, making it a great option for those on a budget.
Acoustic Panels
Acoustic panels are a popular choice for sound absorption and diffusion. They are typically made of fabric or fiberglass and can be installed on walls, ceilings, or floors.
Bass Traps
Bass traps are designed to absorb low-frequency sound waves. They are typically made of foam or fiberglass and can be installed in corners or against walls.
Curtains and Blankets
Curtains and blankets can also be used for sound absorption and diffusion. They are a flexible and affordable option that can be easily moved or rearranged.
Other Treatment Options
Other options for acoustic treatment include sound-absorbing tiles, diffusers, and clouds. These can be more expensive than foam or curtains, but can provide better results.
Applying Acoustic Treatment
Once you have chosen the materials for your acoustic treatment, the next step is to apply them to your studio space. This can be done by following these steps:
Measuring and Analyzing Your Space
Before applying any acoustic treatment, it is important to measure and analyze the acoustic properties of your studio space. This can be done using a sound level meter or an acoustic analyzer.
Placing Treatment Materials
Once you have measured and analyzed your space, you can begin placing the treatment materials. Start by treating the corners and walls, as these are the areas that will have the most impact on the sound quality.
Calibrating Your Space
After you have applied the acoustic treatment, it is important to calibrate your space. This can be done using a calibration microphone or an audio analyzer. Calibrating your space will ensure that the recorded sound is as accurate as possible.
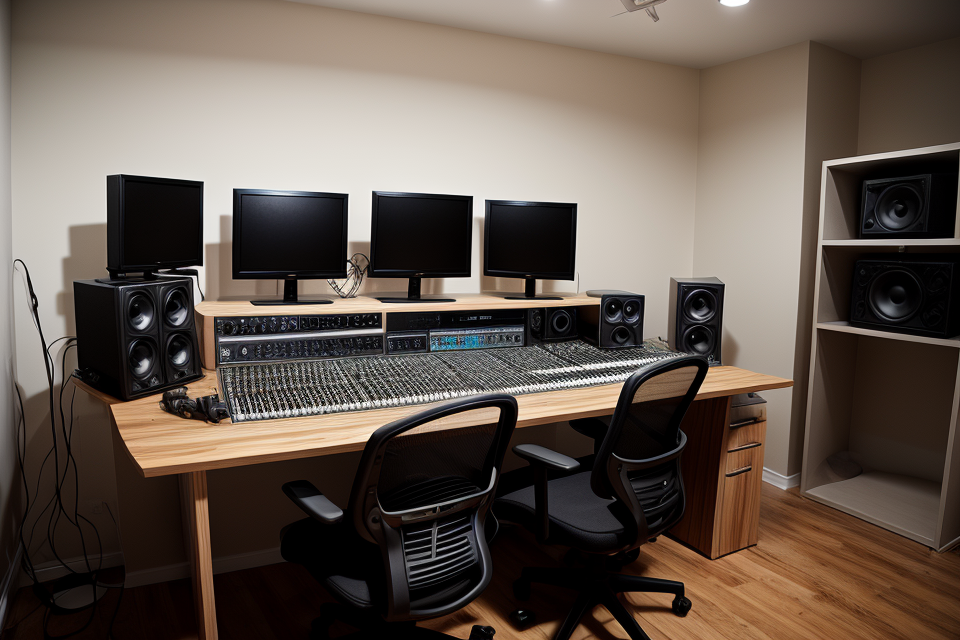
Studio Furniture and Layout
Essential Studio Furniture
Setting up a professional recording studio on a budget requires careful consideration of essential furniture pieces that are necessary for efficient and comfortable recording sessions. The following are some of the essential furniture pieces that you should consider:
Desk or Workstation
A desk or workstation is a crucial piece of furniture in a recording studio. It serves as the central hub for all your recording equipment and should be designed to accommodate all your gear. A well-designed desk or workstation will help you keep your equipment organized, easily accessible, and ensure that your cables are properly managed.
When choosing a desk or workstation, consider the following factors:
- Size: The desk or workstation should be large enough to accommodate all your equipment comfortably.
- Shape: Consider the shape of the desk or workstation depending on the layout of your studio. A corner desk may be a good option if you have limited space.
- Material: Choose a material that is durable and easy to clean. Wood is a popular choice, but laminate and metal are also good options.
Chair
A comfortable chair is essential for long recording sessions. It should provide adequate support for your back and legs to ensure that you can work for extended periods without experiencing discomfort. A good studio chair should also be adjustable to accommodate different heights and preferences.
When choosing a chair, consider the following factors:
- Comfort: The chair should be comfortable and provide adequate support for your back and legs.
- Adjustability: The chair should be adjustable to accommodate different heights and preferences.
- Durability: Choose a chair that is durable and can withstand regular use.
Storage Solutions
Storage solutions are crucial in a recording studio to keep your equipment and cables organized. A well-designed storage solution will help you save space, reduce clutter, and make your studio more efficient. There are various storage solutions available, including racks, cabinets, and shelves.
When choosing storage solutions, consider the following factors:
- Size: The storage solution should be large enough to accommodate all your equipment comfortably.
- Material: Choose a material that is durable and easy to clean. Metal is a popular choice, but wood and plastic are also good options.
- Configuration: Consider the configuration of the storage solution to ensure that it fits your studio layout and equipment.
Other Furniture Options
Other furniture options that you may consider include a couch or seating area for clients or guests, a kitchenette or refreshment area, and lighting solutions. These furniture options will help you create a comfortable and welcoming environment for your clients or guests.
Optimizing Your Studio Layout
Optimizing your studio layout is crucial for efficient and comfortable recording sessions. A well-designed studio layout will help you minimize noise, reduce clutter, and improve workflow. The following are some tips for optimizing your studio layout:
Workflow Considerations
Consider your workflow when designing your studio layout. Your workflow should be efficient and well-organized to ensure that you can work quickly and efficiently. Identify the most frequently used equipment and ensure that it is easily accessible.
Space Optimization Tips
Maximize your studio space by using vertical storage solutions, such as shelves and racks. This will help you save space and reduce clutter. Consider using a small room or closet for storage to free up space in your main studio area. Use curtains or soundproofing materials to minimize noise and create a more comfortable recording environment.
Recording and Producing in Your Studio
Setting Up Your DAW
Installing Your DAW
Windows
- Visit the official website of your chosen DAW and download the latest version.
- Locate the downloaded file and double-click to begin the installation process.
- Follow the on-screen instructions, accepting the default settings where appropriate.
- Once the installation is complete, launch the DAW and familiarize yourself with the interface.
MacOS
- Open the App Store and search for your chosen DAW.
- Click on the DAW’s icon to begin the download and installation process.
- Once the installation is complete, launch the DAW and familiarize yourself with the interface.
Configuring Your DAW
Hardware Setup
- Connect your microphone and any other audio input devices to your computer.
- Configure your DAW to recognize the newly connected hardware.
- Set up input levels and monitor levels for each device in the DAW.
Software Setup
- Ensure that all necessary plugins and virtual instruments are installed and up-to-date.
- Configure the DAW to recognize and use any external controllers or MIDI devices.
- Set up your preferred workflow within the DAW, including workspace layout and key bindings.
Workflow Customization
- Familiarize yourself with the DAW’s built-in tools and features, such as EQ, compression, and reverb.
- Experiment with different workflows and techniques to find what works best for you.
- Utilize online resources and communities to learn from other producers and improve your skills.
Recording and Producing Your Tracks
Recording Vocals
Choosing a Microphone
Choosing the right microphone is crucial for recording high-quality vocals. The most important factors to consider when choosing a microphone are the type of microphone, the polar pattern, and the frequency response. Condenser microphones are the most popular choice for recording vocals, as they are known for their accurate frequency response and ability to capture even the most subtle nuances of a performance. However, large-diaphragm condenser microphones can be expensive, so it’s essential to choose one that fits your budget.
Setting Up Your Microphone
Once you’ve chosen your microphone, it’s time to set it up. Start by positioning the microphone about six inches away from the mouth of the performer, and angled slightly off-axis to avoid popping sounds. It’s also essential to ensure that the microphone is placed in the right direction, with the logo facing towards the performer. If possible, use a microphone stand with adjustable height and angle to get the perfect position.
Recording Vocal Tracks
Now that your microphone is set up, it’s time to start recording. Start by asking the performer to sing or speak into the microphone, and then adjust the microphone position as needed to achieve the desired sound. Use a pop filter to minimize popping sounds, and monitor the performance using headphones to ensure that the levels are correct. When you’re satisfied with the take, hit the record button and start capturing the performance.
Recording Instruments
Recording instruments requires a similar approach to recording vocals. Choose a microphone that’s suitable for the instrument you’re recording, and position it in the right place to capture the best sound. Experiment with different microphone positions and angles to find the ideal sound, and use headphones to monitor the performance.
As with recording vocals, choosing the right microphone is essential for recording high-quality instrument tracks. The type of microphone you choose will depend on the instrument you’re recording. For example, dynamic microphones are ideal for recording drums, while ribbon microphones are great for capturing the warmth of an acoustic guitar.
Once you’ve chosen your microphone, it’s time to set it up. Start by positioning the microphone in the right place to capture the best sound. Experiment with different microphone positions and angles to find the ideal sound, and use a microphone stand with adjustable height and angle to get the perfect position.
Recording Instrument Tracks
Now that your microphone is set up, it’s time to start recording. Start by asking the performer to play the instrument, and then adjust the microphone position as needed to achieve the desired sound. Use headphones to monitor the performance, and when you’re satisfied with the take, hit the record button and start capturing the performance.
Mixing and Mastering Your Tracks
Once you’ve recorded your tracks, it’s time to mix and master them to create a polished final product. Mixing involves adjusting the levels and panning of each track to create a balanced mix, while mastering involves applying final adjustments to the overall volume and tone of the mix. With the right tools and techniques, you can create professional-sounding tracks on a budget.
Troubleshooting and Maintenance
Common Studio Issues
Noise and Interference
One of the most common issues in a recording studio is noise and interference. This can be caused by a variety of factors, such as electrical interference from nearby equipment, ambient noise from outside the studio, or hum from poorly shielded cables. To minimize noise and interference, it’s important to properly shield and ground your cables, use high-quality noise-isolating microphones, and acoustically treat your studio space.
Cable Management
Another common issue in a recording studio is poor cable management. Messy cables can lead to tangles, interference, and even damage to your equipment. To prevent these problems, it’s important to keep your cables organized and tidy. This can be done by using cable organizers, labeling your cables, and keeping them away from areas where they can be easily damaged.
Equipment Failure
Equipment failure can be a major setback for any recording studio. To prevent this, it’s important to regularly maintain and inspect your equipment. This includes cleaning your equipment regularly, checking for any signs of wear or damage, and ensuring that all of your equipment is properly powered and connected.
Other Issues
There are many other issues that can arise in a recording studio, such as software and hardware compatibility issues, power supply problems, and more. It’s important to be proactive in identifying and addressing these issues before they become major problems.
Preventative Maintenance
To prevent these issues from arising in the first place, it’s important to implement preventative maintenance procedures in your studio. This includes cleaning and maintaining your equipment regularly, updating your software and drivers, and regularly backing up your work.
Cleaning and Maintaining Your Equipment
Keeping your equipment clean and well-maintained is crucial for ensuring that it functions properly. This includes cleaning your microphones and other equipment with a soft, dry cloth, avoiding the use of liquids or harsh chemicals, and periodically inspecting your equipment for any signs of wear or damage.
Updating Your Software and Drivers
It’s important to keep your software and drivers up to date to ensure compatibility with your equipment and to take advantage of new features and improvements. Regularly checking for and installing updates can help prevent issues with your software and hardware.
Regularly Backing Up Your Work
Finally, it’s important to regularly back up your work to prevent data loss in case of equipment failure or other issues. This can be done using an external hard drive or cloud-based storage services.
Expanding Your Studio
Expanding your studio can help you take your productions to the next level. However, it’s important to plan your budget carefully to avoid overspending.
Additional Equipment
To expand your studio, you may need to purchase additional equipment. Some essential items include:
- A second microphone: Adding a second microphone can provide more options for capturing sound sources and create a more dynamic mix.
- An audio interface: An audio interface can provide more inputs and outputs, allowing you to connect more equipment to your computer.
- A MIDI controller: A MIDI controller can provide a more intuitive way to control software instruments and automation.
Analog Equipment
Analog equipment can add warmth and character to your recordings. Some essential items include:
- A tape machine: A tape machine can add warmth and saturation to your recordings.
- A compressor: A compressor can help you control the dynamics of your recordings and add sustain to your sounds.
- An equalizer: An equalizer can help you shape the tone of your recordings and cut out unwanted frequencies.
Outboard Gear
Outboard gear can provide additional processing options and improve the quality of your recordings. Some essential items include:
- A reverb unit: A reverb unit can add space and depth to your recordings.
- A distortion pedal: A distortion pedal can add bite and aggression to your recordings.
- A modulation effect: A modulation effect can add movement and interest to your recordings.
Software Plugins
Software plugins can provide additional processing options and save you money compared to purchasing hardware. Some essential items include:
- A reverb plugin: A reverb plugin can add space and depth to your recordings.
- A distortion plugin: A distortion plugin can add bite and aggression to your recordings.
- A modulation plugin: A modulation plugin can add movement and interest to your recordings.
Upgrading Your Space
Upgrading your space can help you create better recordings and improve your workflow. Some essential upgrades include:
- Acoustic treatment: Acoustic treatment can help you control the reverberation and reflections in your space and create a more neutral listening environment.
- Studio furniture: Studio furniture can help you optimize your workflow and create a more comfortable working environment.
- Expanding your space: Expanding your space can provide more room for equipment and create a more spacious working environment.
Acoustic Treatment Upgrades
Acoustic treatment upgrades can help you control the reverberation and reflections in your space and create a more neutral listening environment. Some essential upgrades include:
- Acoustic panels: Acoustic panels can absorb sound waves and reduce reflections.
- Diffusers: Diffusers can scatter sound waves and reduce reflections.
- Bass traps: Bass traps can absorb low-frequency sound waves and reduce booming.
Studio Furniture Upgrades
Studio furniture upgrades can help you optimize your workflow and create a more comfortable working environment. Some essential upgrades include:
- A mixing console: A mixing console can provide a central hub for controlling your equipment and creating a more organized workflow.
- A control room chair: A control room chair can provide comfortable seating for long mixing sessions.
- A studio desk: A studio desk can provide a dedicated workspace for your equipment and create a more organized workflow.
Expanding Your Space
Expanding your space can provide more room for equipment and create a more spacious working environment. Some essential upgrades include:
- Building an isolation booth: An isolation booth can provide a controlled environment for recording instruments and vocals.
- Building a second studio: A second studio can provide additional space for recording and mixing.
- Adding a live room: A live room can provide a spacious environment for recording bands and
FAQs
1. What equipment do I need to set up a professional recording studio on a budget?
Setting up a professional recording studio on a budget requires some essential equipment that includes a computer or laptop with a digital audio workstation (DAW) software, a microphone, headphones, a basic audio interface, and acoustic treatment materials such as foam or blankets to cover walls and ceilings. You can also invest in a midi controller to control your software and hardware.
2. How do I choose the right microphone for my recording studio?
Choosing the right microphone depends on your budget and the type of recording you want to do. If you’re on a tight budget, you can start with a dynamic microphone, which is affordable and versatile. If you’re planning to record vocals or instrumentals, you may want to invest in a condenser microphone, which provides higher quality sound. It’s important to do research and read reviews before purchasing a microphone to ensure you get the best quality for your budget.
3. What kind of audio interface do I need for my recording studio?
An audio interface is a device that connects your microphone and other audio equipment to your computer or laptop. It’s important to choose an audio interface that has enough inputs and outputs to accommodate your equipment. For example, if you’re planning to record multiple instruments or vocals, you’ll need an audio interface with multiple input channels. A basic audio interface can cost around $100, while more advanced ones can cost upwards of $1000.
4. How do I set up acoustic treatment in my recording studio?
Acoustic treatment is essential to control echo and reverb in your recording studio. You can start by hanging foam or blankets on your walls and ceilings to absorb sound. You can also purchase bass traps to help control low-frequency sounds. It’s important to experiment with different materials and arrangements to find the best acoustic treatment for your studio.
5. How do I create a comfortable and functional control room in my recording studio?
Creating a comfortable and functional control room is important for your recording sessions. You can start by ensuring that your control room is well-ventilated and free from distractions. You can also invest in a comfortable chair and desk to ensure that you can work for long periods of time without discomfort. Additionally, you can place your monitors and other equipment at the appropriate height and angle to ensure that you can hear and see everything clearly.
