Are you tired of recording your vocals and not being satisfied with the sound? The close mic technique might be the solution you’ve been looking for. This technique involves placing a microphone very close to the singer’s mouth, which can capture the sound of the voice in a more direct and intimate way. By doing so, it eliminates unwanted background noise and gives the vocals a clearer, more focused sound. In this guide, we’ll explore the close mic technique in depth, including how to set up your equipment, where to place the microphone, and tips for achieving the best possible sound. So whether you’re a seasoned pro or just starting out, read on to discover how the close mic technique can take your vocal recordings to the next level.
What is the Close Mic Technique?
How it Works
The close mic technique is a method of recording vocals that involves placing a microphone very close to the singer’s mouth. This approach has several advantages over traditional techniques, such as capturing the subtle nuances of the vocal performance and reducing background noise. In this section, we will delve into the details of how the close mic technique works.
Advantages of Close Mic Technique
One of the main advantages of the close mic technique is that it allows for a more focused and direct sound capture. By placing the microphone close to the singer’s mouth, the microphone is able to pick up the individual sound waves of the vocal cords, resulting in a more detailed and accurate representation of the singer’s voice. Additionally, this method helps to reduce ambient noise and room reflections, which can negatively impact the overall sound quality of the recording.
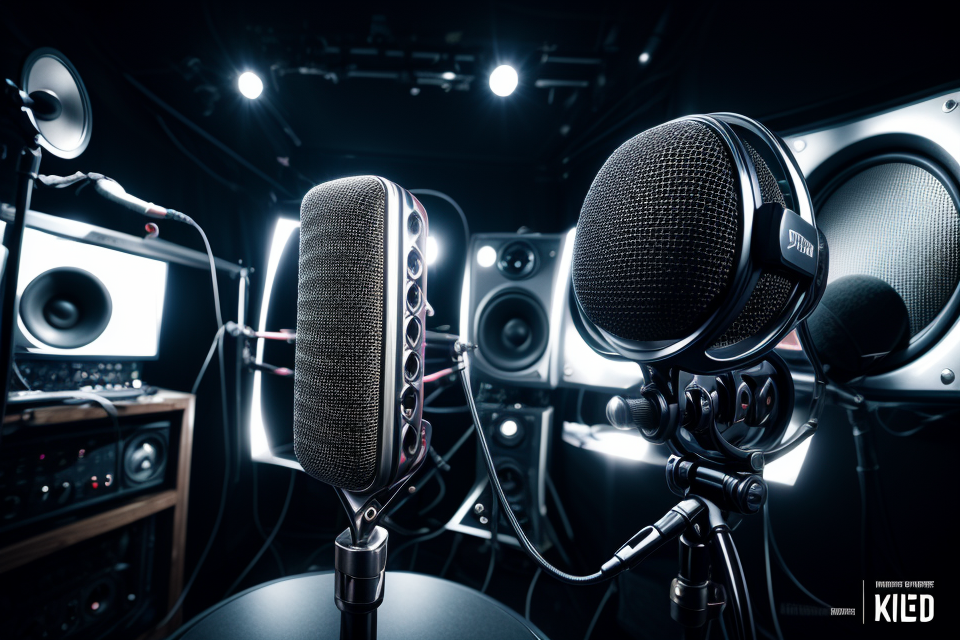
Proper Microphone Selection
Another key aspect of the close mic technique is the selection of the appropriate microphone. The microphone used should be capable of capturing the full frequency range of the singer’s voice, from the lowest lows to the highest highs. A high-quality condenser microphone is often recommended for this technique, as it is able to accurately capture the nuances of the vocal performance.
Microphone Placement
The placement of the microphone is also critical when using the close mic technique. The microphone should be positioned directly in front of the singer’s mouth, with the diaphragm of the microphone facing the sound source. This positioning ensures that the microphone is able to capture the most accurate representation of the singer’s voice, without any unwanted reflections or ambient noise.
Gain Staging
Finally, it is important to pay attention to the gain staging when using the close mic technique. Gain staging refers to the process of adjusting the levels of the microphone preamp, the DAW, and the output stage to achieve the desired sound level. This process is critical to ensuring that the recording is not too loud or too quiet, and that the sound quality is optimal.
In conclusion, the close mic technique is a powerful method for improving vocal recordings. By using the right microphone, proper microphone placement, and careful gain staging, singers can capture their vocal performances with greater accuracy and clarity than ever before.
Benefits of Using the Close Mic Technique
Improved Sound Quality
One of the primary benefits of using the close mic technique is the improved sound quality of the vocal recordings. By placing the microphone close to the singer’s mouth, the microphone can capture the nuances and subtleties of the voice, resulting in a more accurate and natural representation of the sound. This can help to reduce the amount of background noise and enhance the clarity of the vocals, making them stand out in the mix.
Increased Control Over the Sound
Another benefit of using the close mic technique is the increased control over the sound. With a close microphone, the sound engineer has more control over the tonal balance of the vocals, allowing them to shape the sound to suit the desired outcome. This can be particularly useful when recording vocals in a noisy environment, as the close mic technique can help to isolate the vocals and reduce the impact of background noise.
More Intimate and Personal Sound
The close mic technique can also create a more intimate and personal sound, as it captures the subtle variations in the singer’s voice. This can be particularly effective when recording solo performances, as it can create a sense of closeness and intimacy between the performer and the listener. This can be particularly effective when recording solo performances, as it can create a sense of closeness and intimacy between the performer and the listener.
Easier to Achieve Consistent Sound
Finally, the close mic technique can make it easier to achieve a consistent sound when recording vocals. By placing the microphone in the same position for each take, the sound engineer can ensure that the vocals are captured consistently, making it easier to blend the vocals with other instruments in the mix. This can help to create a more cohesive and polished sound, making the final recording more professional and appealing.
Choosing the Right Microphone for Close Mic Recording
Factors to Consider
When selecting a microphone for close mic recording, there are several factors to consider to ensure that you get the best results. Here are some of the most important factors to keep in mind:
- Type of Microphone: The first decision you need to make is whether to use a dynamic or condenser microphone. Dynamic microphones are less sensitive and can handle louder sounds, making them a good choice for live performances or recording loud instruments. Condenser microphones, on the other hand, are more sensitive and better suited for recording vocals and acoustic instruments.
- Polar Pattern: The polar pattern of a microphone determines how it captures sound. Some microphones are omnidirectional, meaning they pick up sound from all directions, while others are unidirectional or bidirectional, capturing sound from specific directions. The polar pattern you choose will depend on the layout of your recording setup and the type of sound you want to capture.
- Frequency Response: Frequency response refers to the range of frequencies that a microphone can capture. Some microphones are designed to capture low frequencies, while others are better suited for capturing high frequencies. When choosing a microphone, it’s important to consider the frequency range of the sound you want to capture and choose a microphone that can handle that range.
- Sensitivity: Sensitivity refers to the amount of sound pressure level (SPL) that a microphone can handle before distorting. Higher sensitivity means that the microphone can handle louder sounds without distortion. If you’re recording loud instruments or performances, you’ll need a microphone with a higher sensitivity.
- Price: Finally, the price of the microphone is an important factor to consider. Microphones can range from affordable options to high-end models that can cost thousands of dollars. Consider your budget and choose a microphone that fits your needs and budget.
Recommended Microphones for Close Mic Recording
When it comes to close mic recording, choosing the right microphone is crucial to achieving high-quality vocal recordings. Here are some recommended microphones for close mic recording:
- Shure SM58
- The Shure SM58 is a classic microphone that is commonly used for live performances and studio recordings.
- It has a frequency response that is tailored for vocals, with a presence boost to emphasize the mid-range frequencies.
- The SM58 also has a cardioid pickup pattern, which helps to minimize background noise and feedback.
- Neumann TLM 103
- The Neumann TLM 103 is a versatile microphone that is suitable for a wide range of vocal applications.
- It has a flat frequency response, which makes it ideal for accurate reproduction of the vocal tone.
- The TLM 103 also has a high-quality condenser element, which provides excellent sensitivity and clarity.
- AKG C414
- The AKG C414 is a multi-pattern microphone that is well-suited for close mic recording.
- It has a wide frequency range, which allows it to capture the full range of vocal frequencies.
- The C414 also has a switchable polar pattern, which enables you to choose between different pickup configurations depending on your recording setup.
- Sennheiser MD 421
- The Sennheiser MD 421 is a dynamic microphone that is commonly used for recording vocals in studios.
- It has a frequency response that is optimized for vocals, with a boost in the mid-range frequencies to enhance clarity.
- The MD 421 also has a supercardioid pickup pattern, which helps to reduce background noise and feedback.
Overall, these microphones are excellent choices for close mic recording, as they provide high-quality sound and versatile features that can help you achieve professional-sounding vocal recordings.
Setting Up the Microphone for Close Mic Recording
Microphone Placement
When it comes to capturing high-quality vocal recordings, the placement of the microphone is crucial. The close mic technique requires the microphone to be placed close to the singer’s mouth to capture the nuances of their voice. However, finding the perfect microphone placement can be a bit tricky. Here are some tips to help you achieve the best microphone placement for your close mic recording:
Proper Distance
The first thing to consider is the distance between the microphone and the singer’s mouth. In general, you want to keep the microphone around 6 to 12 inches away from the singer’s mouth. This distance allows the microphone to capture the full range of frequencies in the singer’s voice while minimizing background noise.
Positioning
Another important factor to consider is the positioning of the microphone. When using the close mic technique, it’s best to position the microphone at a 90-degree angle to the singer’s mouth. This angle allows the microphone to capture the sound waves from the singer’s mouth in the most direct way possible, resulting in a clear and focused recording.
Avoiding Reflections
When placing the microphone, it’s also important to avoid reflective surfaces. Reflections can cause unwanted echoes and reverberation, which can degrade the quality of the recording. Try to place the microphone in a location where there are no reflective surfaces nearby, such as walls, ceilings, or windows.
Experimentation
While there are general guidelines for microphone placement, every singer and recording situation is unique. Experimentation is key to finding the perfect microphone placement for your close mic recording. Try different distances and angles to see what works best for your particular setup.
In summary, the key to achieving the best microphone placement for your close mic recording is to keep the microphone around 6 to 12 inches away from the singer’s mouth, position the microphone at a 90-degree angle to the singer’s mouth, avoid reflective surfaces, and experiment to find the best placement for your specific situation.
Adjusting the Microphone Settings
Adjusting the microphone settings is a crucial step in achieving optimal sound quality when using the close mic technique. Here are some tips to keep in mind when adjusting your microphone settings:
- Polar Pattern: The polar pattern of the microphone determines which direction it picks up sound from. When using the close mic technique, it’s important to choose a microphone with a cardioid or supercardioid polar pattern, as these patterns pick up sound mainly from the front of the microphone and reduce unwanted background noise.
- Gain: Gain refers to the amplification of the signal that the microphone sends to the recording device. Too much gain can result in distortion, while too little gain can result in a weak signal. When adjusting the gain, start at a low setting and gradually increase it until you reach the desired level. It’s also a good idea to monitor the output of the microphone on a recording device or audio interface to ensure that the signal is not distorted.
- Phantom Power: Many microphones require phantom power to operate. Phantom power is a type of electrical power that is supplied to the microphone through the microphone cable. It’s important to ensure that the recording device is set to provide phantom power to the microphone, otherwise the microphone will not work.
- Filter Settings: Some microphones have built-in filters that can be used to reduce unwanted noise or enhance certain frequencies. When using the close mic technique, it’s a good idea to experiment with different filter settings to find the one that works best for your particular recording situation.
By adjusting these microphone settings, you can ensure that your close mic recordings sound their best. Remember to listen carefully to the output of the microphone and make adjustments as needed to achieve the desired sound quality.
Techniques for Achieving the Best Sound Quality with Close Mic Recording
Proper Vocal Techniques
Proper vocal techniques are crucial for achieving the best sound quality with close mic recording. The following are some key considerations:
- Warm-up exercises: Before recording, it is essential to warm up the vocal cords to prevent strain and ensure proper functioning. This can include humming, lip trills, and other vocal exercises that help to stretch and strengthen the vocal cords.
- Posture: Proper posture is essential for good vocal technique. The singer should stand upright with their feet shoulder-width apart, with their shoulders relaxed and their chest open. The microphone should be positioned close to the mouth to capture the best sound quality.
- Breath control: Breath control is crucial for good vocal technique. Singers should take deep breaths and exhale slowly as they sing, ensuring that they have enough air to support their vocals.
- Pitch and tone: Proper pitch and tone are essential for good vocal technique. Singers should focus on maintaining a consistent pitch and using proper vocal techniques to achieve the desired tone.
- Articulation: Clear articulation is crucial for good vocal technique. Singers should enunciate clearly and avoid mumbling or slurring their words.
- Dynamics: Dynamics refer to the variations in volume and intensity within a song. Singers should pay attention to dynamics, adjusting their volume and intensity to suit the mood and style of the song.
- Emotion and expression: Emotion and expression are essential components of good vocal technique. Singers should strive to convey the meaning and emotion of the song through their vocals, using proper technique to ensure that their performance is both powerful and nuanced.
By focusing on these key elements of proper vocal technique, singers can improve their sound quality and deliver powerful, emotionally resonant performances.
Reducing Background Noise
When it comes to recording vocals, background noise can be a major obstacle to achieving a high-quality sound. Fortunately, there are several techniques that can help reduce background noise and improve the overall sound quality of your recordings.
One effective way to reduce background noise is to use a high-quality microphone with a good noise-to-signal ratio. This means that the microphone is able to pick up the sound of your voice while minimizing the amount of background noise that is captured. Some microphones are specifically designed to reduce background noise, so it may be worth investing in one of these if you are serious about improving the sound quality of your recordings.
Another technique for reducing background noise is to use a pop filter. A pop filter is a small screen that is placed in front of the microphone to help reduce the amount of plosive sounds (such as “p” and “b” sounds) that can create a loud, unwanted noise in your recordings. By using a pop filter, you can help minimize the amount of background noise that is captured by the microphone.
In addition to using a high-quality microphone and pop filter, there are other ways to reduce background noise in your recordings. For example, you can try recording in a quiet room with minimal outside noise, or you can use a noise-cancelling headset to block out background noise while you record.
Overall, reducing background noise is an important aspect of achieving the best sound quality with close mic recording. By using a high-quality microphone, pop filter, and other techniques, you can help minimize the amount of background noise that is captured and improve the overall sound quality of your recordings.
Using a Pop Filter and Shield
When recording vocals, using a pop filter and shield is essential to ensure high-quality sound. A pop filter is a screen-like device that is placed between the microphone and the singer’s mouth to prevent popping sounds caused by bursts of air. Pop filters are particularly useful when recording vocals with plosive consonants like “p,” “b,” “t,” and “d.”
On the other hand, a microphone shield is a barrier that is placed between the microphone and the singer’s mouth to reduce the proximity effect. The proximity effect is a phenomenon that occurs when a microphone is placed too close to a sound source, resulting in a boosted bass response. A microphone shield helps to reduce this effect, resulting in a more balanced sound.
To use a pop filter and shield effectively, follow these steps:
- Place the pop filter between the microphone and the singer’s mouth. The pop filter should be positioned about an inch away from the microphone.
- Ensure that the pop filter is securely attached to the microphone stand or boom arm to prevent it from moving during recording.
- Adjust the microphone position to ensure that it is not too close to the singer’s mouth, to avoid the proximity effect. A distance of about six inches from the singer’s mouth is usually ideal.
- Ask the singer to speak or sing slightly off-axis to the microphone to reduce the risk of popping sounds.
By using a pop filter and shield, you can improve the quality of your vocal recordings and reduce the risk of unwanted sounds and effects.
Tips for Getting the Best Sound Quality
Recording vocals can be a daunting task, especially when it comes to achieving the best sound quality. With the close mic technique, you can get closer to your desired sound without spending too much money on expensive equipment. Here are some tips to help you get the best sound quality with close mic recording:
Choose the Right Microphone
The first step in achieving the best sound quality with close mic recording is to choose the right microphone. There are many different types of microphones available, each with its own unique characteristics. Some microphones are better suited for capturing vocals, while others are better for capturing instruments.
When choosing a microphone, consider the type of microphone, the brand, and the price. Some popular brands of microphones include Shure, Audio-Technica, and Sennheiser. You can also read reviews and ask other musicians for recommendations.
Select the Right Placement
Once you have chosen the right microphone, it’s time to select the right placement. The placement of the microphone can have a significant impact on the sound quality of your recording. Generally, you want to place the microphone close to the source of the sound, which in this case is your vocal cords.
When placing the microphone, try to avoid placing it too close to the mouth or nose, as this can cause a “popping” sound. Instead, place the microphone slightly off to the side of your mouth, around the corners of your jaw and mouth.
Consider the Room Acoustics
The room acoustics can also have a significant impact on the sound quality of your recording. Avoid recording in rooms with hard surfaces, such as concrete or metal, as these can cause echoes and reverberation. Instead, choose a room with soft surfaces, such as carpet or curtains, to help absorb sound.
You can also use acoustic panels or foam to help improve the sound quality of your recording. These materials can help absorb sound and reduce echoes and reverberation.
Use a Pop Filter
A pop filter is a small screen that fits over the microphone to help reduce “popping” sounds. When you sing or speak, you may produce a small explosion of air that can cause a “popping” sound. A pop filter can help reduce this sound and improve the overall sound quality of your recording.
When using a pop filter, make sure it is placed close to the microphone, but not too close. A good rule of thumb is to place the pop filter about an inch away from the microphone.
By following these tips, you can improve the sound quality of your vocal recordings with the close mic technique. With the right microphone, placement, room acoustics, and pop filter, you can achieve professional-sounding recordings without breaking the bank.
Common Mistakes to Avoid When Using the Close Mic Technique
Improper Microphone Placement
Proper microphone placement is crucial when using the close mic technique. It can significantly impact the quality of your vocal recordings. Improper microphone placement can lead to unwanted sounds, such as popping, hissing, or feedback, which can be difficult to remove during the mixing process.
Here are some common mistakes to avoid when it comes to microphone placement:
- Placing the microphone too close to the mouth: This can result in a harsh, unnatural sounding recording. It’s important to keep a small distance between the microphone and the mouth to avoid capturing excessive breath sounds.
- Not paying attention to the angle of the microphone: The angle of the microphone can affect the tone and clarity of the recording. Placing the microphone at a slight angle can help capture a more natural sound.
- Ignoring the proximity effect: The proximity effect is a phenomenon where a microphone picks up more low-frequency sounds when it’s placed close to a sound source. This can result in a boomy or muddy sound. It’s important to be aware of the proximity effect and adjust the microphone placement accordingly.
- Failing to consider the acoustics of the room: The acoustics of the room can have a significant impact on the quality of the recording. It’s important to choose a location with good sound isolation and minimal background noise.
By avoiding these common mistakes, you can ensure that your close mic technique will yield high-quality vocal recordings.
Inadequate Microphone Settings
One of the most common mistakes when using the close mic technique is inadequate microphone settings. The microphone’s gain, or sensitivity, should be adjusted properly to capture the best sound quality. If the gain is too low, the vocal recording may be too quiet and sound distorted. If the gain is too high, the recording may be too loud and suffer from noise and distortion.
Additionally, it’s important to choose the right microphone for the job. A dynamic microphone is often preferred for vocal recordings because it can handle high sound levels without distortion. However, if the sound level is too high, the microphone may still produce distortion. A condenser microphone, on the other hand, is more sensitive and can capture more detail, but it may be more prone to distortion at high sound levels.
It’s also important to consider the microphone’s polar pattern when positioning it close to the singer. A cardioid pattern is often preferred for vocal recordings because it captures sound from the front of the microphone and reduces sound from the sides and rear. This helps to minimize background noise and ensure that the vocal recording is clear and focused.
In conclusion, adequate microphone settings are crucial for capturing high-quality vocal recordings using the close mic technique. Proper gain adjustment, microphone selection, and polar pattern placement can all contribute to a clear, distortion-free vocal recording.
Poor Vocal Technique
One of the most common mistakes made when using the close mic technique is poor vocal technique. This can include issues such as incorrect breathing, poor posture, and incorrect pitch.
- Incorrect Breathing: Breathing is one of the most important aspects of vocal technique. When singing or speaking into a close mic, it is important to take short, sharp breaths rather than deep, diaphragmatic breaths. This helps to prevent the diaphragm from dropping, which can cause the vocal cords to become strained and hoarse.
- Poor Posture: Good posture is essential for good vocal technique. When using a close mic, it is important to keep the chest and shoulders relaxed and the head up. Avoid slouching or leaning forward, as this can cause tension in the neck and throat, leading to poor sound quality.
- Incorrect Pitch: Finally, incorrect pitch can be a major issue when using a close mic. This is because the microphone is able to pick up even the slightest variations in pitch. To avoid this, it is important to practice good pitch control and to use a tuner to ensure that you are singing or speaking in tune.
By avoiding these common mistakes, you can help to ensure that your vocal recordings are of the highest quality possible.
Overlooking Background Noise Reduction
One of the most common mistakes when using the close mic technique is overlooking background noise reduction. Background noise can significantly impact the quality of your vocal recordings, making them sound amateurish and distracting. It is essential to understand the sources of background noise and take steps to reduce or eliminate them.
Here are some ways to reduce background noise when using the close mic technique:
- Use a noise-canceling microphone: Noise-canceling microphones are designed to pick up sounds from a specific direction and filter out unwanted background noise. They are especially useful when recording in noisy environments or when using multiple microphones.
- Position the microphone correctly: Placing the microphone too close to the source of the background noise can amplify it. Instead, position the microphone at a distance from the noise source and angle it away from the source to reduce the amount of noise that is picked up.
- Use soundproofing materials: If you are recording in a room with a lot of echo or reverberation, soundproofing materials such as acoustic panels or bass traps can help reduce the amount of noise that is reflected back into the microphone.
- Use software to remove background noise: There are several software programs available that can help remove background noise from your recordings. These programs use algorithms to analyze the audio and remove unwanted noise, leaving only the desired sound.
By taking these steps to reduce background noise, you can significantly improve the quality of your vocal recordings and create a more professional-sounding end product.
Final Thoughts on the Close Mic Technique
The close mic technique can be a powerful tool for improving vocal recordings, but it’s important to remember that there is no one-size-fits-all approach to recording. The close mic technique works best when it is tailored to the specific needs of the singer and the song being recorded.
It’s also important to keep in mind that the close mic technique is just one part of the overall recording process. A good recording is the result of careful planning, attention to detail, and a willingness to experiment and try new things.
In addition, it’s important to remember that the close mic technique is not a magic bullet. It can help to improve the sound of a vocal recording, but it’s not going to make a bad recording into a good one. The quality of the recording is ultimately determined by the quality of the source material, and a poorly recorded vocal will always sound poor, no matter how much processing is applied to it.
Overall, the close mic technique is a powerful tool that can be used to improve the sound of vocal recordings, but it’s important to use it in conjunction with other techniques and to tailor it to the specific needs of the singer and the song being recorded. With careful planning and attention to detail, the close mic technique can help to create professional-sounding vocal recordings that are sure to impress.
FAQs
1. What is the close mic technique?
The close mic technique is a method of recording vocals that involves placing a microphone very close to the singer’s mouth, typically just a few inches away. This technique is used to capture the singer’s voice with high accuracy and precision, and to reduce background noise and room ambiance.
2. What are the benefits of using the close mic technique?
The close mic technique offers several benefits for vocal recording. It allows for a more focused and direct sound, which can help to improve the clarity and definition of the vocals. It also reduces the amount of background noise and room ambiance, which can be particularly useful in noisy or reverberant environments. Additionally, the close mic technique can help to emphasize the subtle nuances and details of the singer’s voice, resulting in a more dynamic and expressive performance.
3. What equipment is needed for the close mic technique?
To use the close mic technique, you will need a microphone that is designed for close-up vocal recording, such as a large-diaphragm condenser microphone or a dynamic microphone with a tight pickup pattern. You will also need a microphone stand and a microphone cable to connect the microphone to your recording equipment. Additionally, you may want to consider using a pop filter or windscreen to reduce breath and wind noise.
4. How do I set up the close mic technique?
To set up the close mic technique, start by positioning the microphone directly in front of the singer’s mouth, about 2-4 inches away. Adjust the microphone angle and height to ensure that the microphone is pointing directly at the singer’s mouth, and that the microphone is level with the singer’s mouth. Then, adjust the microphone gain and volume levels to ensure that the vocals are being recorded at an appropriate level.
5. Can the close mic technique be used for all types of singing?
The close mic technique is particularly well-suited for solo vocal performances, as it allows for a very focused and direct sound. However, it may not be as effective for group singing or performances with a lot of background noise, as it can amplify any imperfections in the singer’s voice and make it more difficult to balance the levels of different vocal parts. In these cases, a more traditional recording technique may be more appropriate.


