Building a home studio can be an exciting and rewarding experience for musicians, producers, and content creators. It allows you to record, produce, and mix your music in a comfortable and controlled environment, without the need for expensive equipment or studio rental fees. But what does it take to build a successful home studio? In this guide, we’ll take a look at the essential items and tools that every home studio should have, and provide a comprehensive checklist to help you get started on your journey to creating your own professional-grade recording space. Whether you’re a seasoned pro or just starting out, this guide has something for everyone. So let’s dive in and start building your dream home studio today!
Determine Your Needs and Goals
Assess Your Budget
When building a home studio, it’s crucial to have a clear understanding of your budget. This will help you make informed decisions about the equipment and tools you need to purchase, as well as the costs associated with setting up and maintaining your studio. Here are some steps to help you assess your budget:
- Determine the Total Cost: To start, you need to determine the total cost of building your home studio. This will include the cost of equipment, software, and any other expenses related to setting up your studio. Make sure to consider all costs, including shipping and installation fees.
- Allocate Your Budget: Once you have determined the total cost, you need to allocate your budget. This means setting aside a specific amount of money for each category of equipment or tool you need. For example, you may allocate a certain amount of money for a digital audio workstation (DAW), microphones, and monitors.
- Prioritize Your Purchases: With your budget allocated, you can start prioritizing your purchases. It’s essential to prioritize equipment that will have the most significant impact on the quality of your recordings. For example, investing in high-quality microphones and monitors should be a priority, while other equipment such as cables and stands can be purchased later on.
- Consider Used Equipment: If your budget is tight, consider purchasing used equipment. You can often find great deals on used gear, which can help you save money without sacrificing quality.
- Look for Deals and Discounts: Keep an eye out for deals and discounts on equipment and software. Many companies offer sales and promotions throughout the year, so it’s worth waiting for the right deal to come along.
By following these steps, you can assess your budget and make informed decisions about the equipment and tools you need to build your home studio. Remember, it’s essential to set a realistic budget and prioritize your purchases to ensure you get the most out of your investment.
Identify Your Sound Requirements
Before building a home studio, it is essential to identify your sound requirements. This includes determining the type of music or audio content you plan to produce, the equipment you already have, and the desired outcome of your recordings. Here are some factors to consider when identifying your sound requirements:
- Genre and Style: Different genres of music have different sound requirements. For example, hip-hop and electronic music typically require more bass-heavy sounds, while acoustic and classical music require more precise and natural sound reproduction.
- Type of Content: Determine the type of content you plan to produce in your home studio. Will you be recording music, voiceovers, podcasts, or something else? Each type of content has different sound requirements that you need to consider.
- Equipment Availability: Take stock of the equipment you already have. Do you have a good quality microphone, a digital audio workstation (DAW), and a pair of studio monitors? Knowing what equipment you have and what you need to purchase will help you identify your sound requirements.
- Quality and Fidelity: Consider the quality and fidelity of your recordings. Do you want your recordings to sound professional and polished, or do you want a more raw and organic sound? This will help you determine the necessary equipment and software for your home studio.
- Space and Acoustics: Finally, consider the space and acoustics of your home studio. Will you be recording in a small room or a large open space? What is the overall sound quality of the room? Consider how you can improve the acoustics of the room with soundproofing materials, acoustic panels, or other sound-absorbing materials.
By considering these factors, you can identify your sound requirements and make informed decisions about the equipment and software you need to build a home studio that meets your needs and goals.
Decide on Your Recording Needs
Before embarking on the journey of building a home studio, it is essential to determine your needs and goals. This section will guide you through the process of identifying your recording needs, which is a crucial aspect of building a home studio.
Identifying Your Recording Needs
- Type of Recording: The first step in determining your recording needs is to identify the type of recording you want to do. This could be music recording, voiceovers, podcasts, or any other type of audio recording. The type of recording will determine the equipment and software you need.
- Quality: The quality of the recording is another essential factor to consider. If you are a beginner, you may not need high-end equipment, but if you are a professional, you will need high-quality equipment to produce professional-grade recordings.
- Budget: Your budget will also play a significant role in determining your recording needs. You need to set a budget and work within it to ensure that you get the best value for your money.
Choosing the Right Equipment
- Microphone: The microphone is the most critical piece of equipment in a home studio. You need to choose a microphone that suits your recording needs and budget. There are various types of microphones, including condenser, dynamic, and ribbon microphones.
- Audio Interface: An audio interface is used to connect your microphone to your computer. It converts the analog signal from your microphone into a digital signal that your computer can understand. You need to choose an audio interface that has enough inputs for all your equipment.
- Headphones: Headphones are essential for monitoring your recordings. You need to choose a pair of headphones that provides accurate sound reproduction and is comfortable to wear for extended periods.
- Computer: Your computer is the brain of your home studio. You need to choose a computer that has enough processing power and storage to handle all your recording needs.
Software
- Digital Audio Workstation (DAW): A DAW is software that you use to record, edit, and mix your recordings. There are various DAWs available, including Pro Tools, Logic Pro, and Ableton Live. You need to choose a DAW that suits your recording needs and is compatible with your equipment.
- Plugins: Plugins are software tools that you can use to enhance your recordings. There are various types of plugins, including equalizers, compressors, and reverb plugins. You need to choose plugins that suit your recording needs and budget.
By following the steps outlined above, you will be able to decide on your recording needs and choose the right equipment and software for your home studio.
Gather the Essential Equipment
Microphone
When it comes to building a home studio, one of the most essential pieces of equipment you’ll need is a microphone. The type of microphone you choose will depend on your specific needs and budget, but there are a few key factors to consider when making your selection.
First, you’ll need to decide whether you want a dynamic or condenser microphone. Dynamic microphones are less sensitive and tend to be more durable, making them a good choice for recording vocals or instruments in a noisy environment. Condenser microphones, on the other hand, are more sensitive and provide a higher level of detail and clarity, making them ideal for recording instruments or vocals in a quiet studio setting.
Next, you’ll need to consider the polar pattern of the microphone. A polar pattern refers to the way the microphone captures sound from different directions. Some microphones are designed to pick up sound from all directions, while others are more directional and will only pick up sound from one direction. This can be an important factor to consider depending on the layout of your home studio and the type of recording you’ll be doing.
Once you’ve decided on the type of microphone you need, you’ll also want to consider the quality of the microphone. There are many different brands and models to choose from, and the price can vary widely depending on the features and quality of the microphone. Some popular brands include Shure, Blue, and Audio-Technica.
In addition to the microphone itself, you’ll also need to consider the necessary accessories, such as a microphone stand and a pop filter. A microphone stand will allow you to position the microphone in the optimal location for your recording, while a pop filter will help to reduce unwanted noise and improve the overall quality of your recordings.
Overall, choosing the right microphone is an important step in building a home studio. With the right microphone, you’ll be able to capture high-quality recordings and produce professional-sounding tracks from the comfort of your own home.
Audio Interface
An audio interface is a crucial component in building a home studio. It serves as the bridge between your recording equipment and your computer, enabling you to capture and record high-quality audio. In this section, we will discuss the key factors to consider when selecting an audio interface for your home studio.
- Number of Inputs: The number of inputs you need depends on the type of recording setup you have. If you plan to record multiple instruments or vocals simultaneously, you will require a higher number of inputs. It’s essential to choose an audio interface with enough inputs to accommodate your recording needs.
- Analog-to-Digital Conversion: The analog-to-digital conversion (ADC) is the process of converting analog audio signals into digital format for digital recording. A high-quality ADC ensures that your recordings maintain their integrity and do not suffer from any loss of quality. Look for an audio interface with a high-resolution ADC for better sound quality.
- Digital-to-Analog Conversion: The digital-to-analog conversion (DAC) is the opposite process, converting digital audio signals back into analog format for playback. A good DAC ensures that your recordings sound clear and accurate during playback. Choose an audio interface with a high-quality DAC for optimal sound quality.
- Preamps: A preamp is an amplifier that boosts the signal before it enters the audio interface. High-quality preamps can significantly improve the tone and clarity of your recordings. Consider an audio interface with high-quality, discrete preamps for better sound quality.
- Input/Output (I/O): The number and type of I/O connections on an audio interface determine how many devices you can connect and how much data can be transferred. Choose an audio interface with enough I/O connections to accommodate your recording setup and future expansion.
- Compatibility: Ensure that your audio interface is compatible with your computer and recording software. USB or Firewire interfaces are the most common options for home studios, but Thunderbolt and PCIe interfaces can offer faster data transfer rates and lower latency.
- Bundled Software: Many audio interfaces come with bundled software that can enhance your recording and mixing capabilities. Consider an audio interface that includes a DAW (Digital Audio Workstation) or other useful software tools to get the most out of your home studio.
By considering these factors, you can select an audio interface that meets your home studio’s requirements and helps you achieve professional-quality recordings.
Headphones
When it comes to building a home studio, headphones are an essential piece of equipment that you cannot afford to overlook. High-quality headphones will allow you to hear every detail of your recordings, making it easier to identify and fix any issues. Here are some factors to consider when choosing headphones for your home studio:
- Sound Quality: Look for headphones that provide accurate sound reproduction. A good pair of headphones should be able to reproduce the entire frequency range, from bass to treble, without distortion.
- Comfort: Since you’ll be wearing your headphones for extended periods, comfort is crucial. Look for headphones that are lightweight, have soft earpads, and a comfortable fit.
- Noise Isolation: Noise isolation headphones are designed to block out external noise, making them ideal for recording in noisy environments. They work by creating a seal around the ear, which helps to block out external sounds.
- Frequency Response: Frequency response refers to the range of frequencies that a pair of headphones can reproduce. Look for headphones with a wide frequency response, as this will allow you to hear all the details of your recordings.
- Driver Size: The size of the driver in a pair of headphones affects the sound quality. Larger drivers typically produce better bass and midrange frequencies, while smaller drivers are better for treble frequencies.
- Connection Type: Consider the type of connection you need for your home studio setup. Wired headphones provide a more stable connection, while wireless headphones offer more flexibility.
- Price: Finally, consider your budget when choosing headphones. There are many high-quality headphones available at various price points, so you don’t have to break the bank to get a good pair of headphones for your home studio.
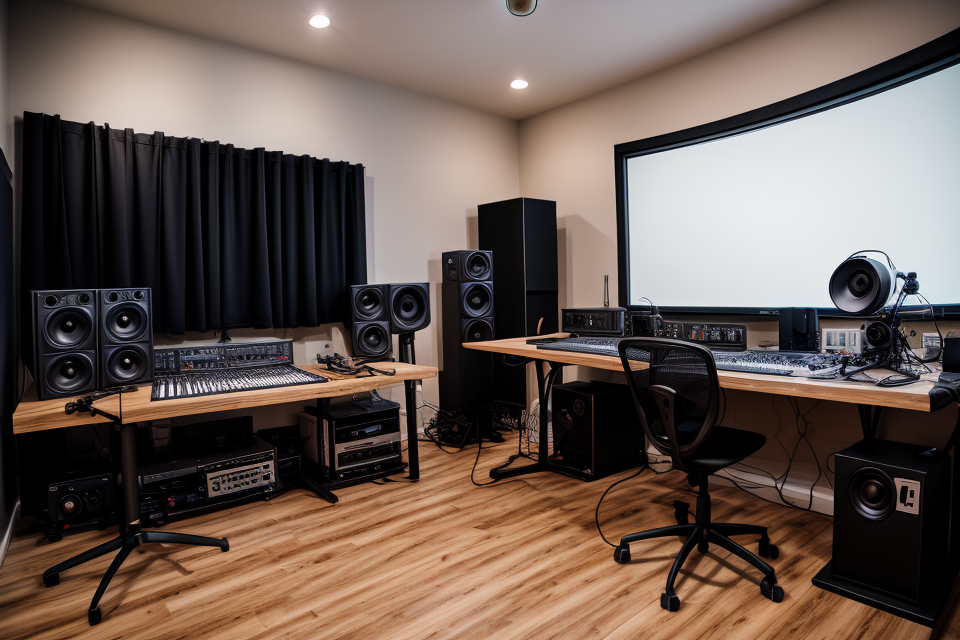
Monitors
When it comes to building a home studio, one of the most important pieces of equipment you’ll need are monitors. These are the screens that you’ll use to view and edit your work. Here are some key factors to consider when choosing monitors for your home studio:
- Size: The size of your monitor will depend on your personal preferences and the amount of space you have available in your studio. Generally, larger monitors provide a more immersive viewing experience, but they can also be more expensive.
- Resolution: The resolution of your monitor refers to the number of pixels it can display. A higher resolution will provide a sharper, more detailed image. If you plan on working with high-resolution images or video, you’ll want to choose a monitor with a high resolution.
- Color accuracy: As a professional photographer, you’ll want to ensure that the colors you see on your monitor are accurate. Look for monitors that have a high color accuracy rating and support calibration using software such as X-Rite i1 Display.
- Connectivity: Make sure that your monitors have the right connectivity options for your equipment. For example, if you’re using a laptop as your main workstation, you’ll want to choose monitors with a Thunderbolt 3 or USB-C port.
- Price: Monitors can range from relatively affordable to very expensive. Set a budget for yourself and choose monitors that fit within that budget while still meeting your needs.
In addition to these factors, you may also want to consider things like screen size, refresh rate, and panel type (such as IPS or TN). Ultimately, the right monitors for your home studio will depend on your specific needs and preferences. By carefully considering these factors, you can choose monitors that will help you produce high-quality work in your home studio.
Acoustic Treatment
- The Importance of Acoustic Treatment
Acoustic treatment is a crucial aspect of building a home studio. It involves controlling and managing the sound within the space to create an optimal listening environment. Proper acoustic treatment can help minimize unwanted reflections, echoes, and reverberations, ensuring that your recordings sound clear, accurate, and professional. - Types of Acoustic Treatment
There are several types of acoustic treatment options available for home studios, including:- Absorption: Acoustic panels, bass traps, and cloud panels are designed to absorb sound waves, reducing reflections and reverberations.
- Diffusion: Diffusers are used to scatter sound waves, creating a more even distribution of sound throughout the room.
- Reflection: Reflectors and mirrors are designed to enhance certain frequencies and control the reflection of sound waves.
- Choosing the Right Acoustic Treatment
Choosing the right acoustic treatment for your home studio depends on several factors, including the size and shape of the room, the type of music or audio you’re recording, and your budget. A professional acoustician or audio engineer can help you assess your space and recommend the best solutions for your specific needs. - Installation and Positioning
Proper installation and positioning of acoustic treatment is essential for optimal results. Panels should be placed strategically around the room, with bass traps placed in the corners and diffusers positioned to scatter sound waves evenly. Reflectors and mirrors should be angled and positioned to enhance specific frequencies. - Ongoing Maintenance
Acoustic treatment is not a one-time solution. Ongoing maintenance is necessary to ensure that your room continues to sound its best. This may include periodic repositioning of panels, adding or removing diffusers, and adjusting reflectors and mirrors as needed.
Instruments and Accessories
As you embark on the journey of building your home studio, it is crucial to ensure that you have all the necessary instruments and accessories. The quality of the equipment you use will have a significant impact on the final output of your recordings. In this section, we will explore the essential instruments and accessories that you need to create a functional and professional home studio.
Essential Instruments
The first step in building your home studio is to gather the essential instruments. The most basic instruments you will need are a microphone and a computer or laptop. The microphone is the most critical piece of equipment for any home studio as it is used to capture the sound of your voice or instrument. There are several types of microphones available, each with its unique characteristics and uses. Some of the most popular microphones for home studios include condenser microphones, dynamic microphones, and ribbon microphones.
Condenser microphones are the most common type of microphone used in home studios. They are known for their accuracy and ability to capture even the most subtle nuances of sound. They are available in different sizes, from small portable models to large studio microphones. Dynamic microphones, on the other hand, are known for their durability and ability to handle high volumes without distortion. They are often used for live performances and are less sensitive than condenser microphones. Ribbon microphones are a less common type of microphone but are known for their warm and natural sound. They are often used for recording vocals and acoustic instruments.
Accessories
In addition to the essential instruments, there are several accessories that you will need to create a functional and professional home studio. These accessories include cables, stands, microphone clips, and wind screens.
Cables are an essential accessory for any home studio. They are used to connect the microphone to the computer or laptop and are available in different lengths and types. XLR cables are the most common type of cable used in home studios and are known for their durability and low noise. USB cables are also popular and are used to connect the microphone to the computer or laptop.
Stands are another essential accessory for any home studio. They are used to hold the microphone in place and prevent it from bumping into other equipment. There are several types of stands available, including boom stands, desk stands, and tripod stands. Boom stands are the most common type of stand used in home studios and are known for their versatility and ability to adjust the height and position of the microphone.
Microphone clips are used to secure the microphone to the stand and prevent it from moving. They are available in different sizes and styles and are essential for ensuring that the microphone remains in the correct position during recording.
Wind screens are used to reduce the impact of unwanted sounds, such as breathing and wind noise. They are available in different sizes and materials and are essential for ensuring that your recordings are clear and professional.
In conclusion, the instruments and accessories you choose for your home studio will have a significant impact on the final output of your recordings. By investing in high-quality equipment and accessories, you can ensure that your home studio is functional, professional, and capable of producing high-quality recordings.
Choose the Right Software
Digital Audio Workstation (DAW)
A Digital Audio Workstation (DAW) is a software application that allows you to create, record, edit, and mix audio content. It is a crucial component of any home studio setup, as it serves as the central hub for all your audio production needs. When choosing a DAW, consider the following factors:
- Compatibility: Ensure that your chosen DAW is compatible with your computer’s operating system and any hardware you plan to use.
- Features: Consider the features offered by each DAW, such as multi-track recording, editing tools, effects processing, and mixing capabilities.
- Ease of use: Opt for a DAW that is user-friendly and easy to navigate, even if you are new to audio production.
- Price: DAWs can range from free to several hundred dollars. Determine your budget and choose a DAW that fits within it.
Some popular DAWs include Ableton Live, Pro Tools, Logic Pro, and FL Studio. It is recommended to try out a few different options to determine which one best suits your needs and workflow.
Virtual Instruments and Plugins
When building a home studio, choosing the right software is crucial to producing high-quality recordings. One important aspect of software is virtual instruments and plugins. These tools allow you to emulate real-world instruments and effects, giving you a wide range of sounds to choose from.
Virtual instruments are software-based versions of real-world instruments, such as pianos, guitars, and drums. They can be used to create realistic sounds or to create unique and experimental sounds. There are many different virtual instruments available, ranging from simple synthesizers to complex orchestral libraries.
Plugins, on the other hand, are software programs that add specific effects or processing to your recordings. For example, you might use a reverb plugin to add space to a vocal recording or a compression plugin to even out the volume of a drum track. There are countless plugins available, each designed to perform a specific task or enhance a particular aspect of your recording.
When choosing virtual instruments and plugins, it’s important to consider your budget and the types of sounds you want to create. Some virtual instruments and plugins are free, while others can be quite expensive. It’s also important to consider the compatibility of the software with your operating system and the hardware you’re using in your home studio.
Overall, virtual instruments and plugins are essential tools for any home studio. With the right software, you can create a wide range of sounds and enhance your recordings to professional standards.
Sample Libraries
When building a home studio, selecting the right software is crucial to producing high-quality recordings. One of the most important aspects of software selection is choosing the right sample libraries.
Sample libraries are collections of pre-recorded sounds that can be used in music production. They include a wide range of instruments, such as pianos, guitars, drums, and synthesizers, as well as sound effects and ambient noises. These libraries are designed to simulate the sound of real instruments and can be used to create a wide range of musical styles.
When selecting sample libraries, it’s important to consider the type of music you want to produce and the instruments you want to use. Some libraries are specialized for specific genres, such as orchestral or electronic music, while others are more general. Additionally, you should consider the quality of the samples, as well as the compatibility with your software.
Some popular sample library brands include Native Instruments, EastWest, and Spitfire Audio. These brands offer a wide range of high-quality samples that can enhance your productions.
When using sample libraries, it’s important to use them ethically and legally. Some libraries may require licensing or royalties, so it’s important to check the terms of use before using them in your productions.
In summary, selecting the right sample libraries is an essential part of building a home studio. By considering the type of music you want to produce, the quality of the samples, and the compatibility with your software, you can choose the best libraries for your needs and create high-quality recordings.
Music Production Apps
When it comes to building a home studio, one of the most important aspects is choosing the right software. Music production apps are an essential tool for any aspiring music producer, as they provide a range of features and capabilities that can help you create professional-sounding tracks.
Here are some key considerations to keep in mind when choosing music production apps:
- Compatibility: Make sure that the app you choose is compatible with your operating system and any hardware you plan to use.
- Features: Consider the specific features you need for your production style, such as virtual instruments, effects, and mixing tools.
- Ease of Use: While it’s important to have powerful tools at your disposal, it’s also important to choose an app that is easy to use and intuitive.
- Cost: Music production apps can range from free to several hundred dollars, so consider your budget when making your choice.
Some popular music production apps include Ableton Live, Logic Pro, and FL Studio. Each of these apps has its own unique features and capabilities, so it’s important to do your research and choose the one that best fits your needs.
Additionally, there are many free and open-source music production apps available, such as Audacity and LMMS, which can be a great option for those on a tight budget.
Ultimately, the right music production app for you will depend on your specific needs and preferences. Take the time to research and try out different options to find the one that best fits your workflow and creative process.
Create the Ideal Environment
Room Treatment
Proper room treatment is a crucial aspect of building a home studio. The room’s acoustics can significantly impact the quality of your recordings. To ensure the best possible sound, consider the following elements:
- Reflection and Absorption: Reflective surfaces, such as hardwood floors, glass, and mirrors, can cause sound reflections that lead to echoes and poor sound quality. To mitigate this, you can use acoustic panels or foam to absorb sound waves and reduce reflections.
- Soundproofing: While some reflection is inevitable, excessive noise from outside or adjacent rooms can interfere with your recordings. To address this, use soundproofing materials like mass-loaded vinyl, acoustic caulk, or even bookshelves filled with heavy books to block sound transmission through walls, floors, and windows.
- Noise Isolation: In addition to blocking external noise, you’ll also want to isolate your recording space from the rest of your home. This will prevent noise from your studio equipment, monitors, or speaking from leaking into other rooms and disturbing others.
- Ideal Dimensions: The ideal room size for a home studio depends on the type of recordings you plan to make. Generally, smaller rooms (around 10 x 12 feet) are better for controlling reflections, while larger rooms (20 x 25 feet) offer more space for placement and movement.
- Corner Traps: Corner traps are a cost-effective solution to improve low-frequency response in your room. They can be easily constructed by attaching mass-loaded vinyl to the corners of your room.
- Equipment Placement: Placing your equipment and speakers strategically can also help improve your room’s acoustics. For example, positioning your speakers away from corners and reflective surfaces can reduce early reflections and enhance stereo imaging.
By addressing these room treatment elements, you’ll create an optimal environment for recording high-quality audio in your home studio.
Acoustic Panels
- Importance of controlling sound reverberation in a home studio
- Role of acoustic panels in absorbing sound waves and reducing echo
- Different types of acoustic panels: foam, fiberglass, and fabric-wrapped
- Factors to consider when choosing acoustic panels: material composition, thickness, and coverage area
- Tips for properly hanging and placing acoustic panels for optimal sound absorption
- Additional considerations: corner traps and bass traps for low-frequency sound control
Properly controlling sound reverberation is crucial in creating a home studio environment that enhances the quality of recorded audio. Reverberation occurs when sound waves bounce off surfaces in a room, creating a buildup of echoes that can hinder the clarity and fidelity of recordings. Acoustic panels play a critical role in reducing reverberation by absorbing sound waves and minimizing echo.
There are different types of acoustic panels available, each with their own unique properties. Foam panels are a popular choice due to their affordability and ease of installation. They are also lightweight and flexible, making them ideal for corners and crevices where other types of panels may not fit. Fiberglass panels, on the other hand, are more durable and offer better sound absorption than foam panels. They are also fire-resistant and can withstand more wear and tear. Fabric-wrapped panels provide a more aesthetically pleasing option, as they can be customized to match the décor of a room.
When choosing acoustic panels, it is important to consider factors such as material composition, thickness, and coverage area. The material composition of a panel will determine its sound absorption capabilities, with denser materials like concrete and brick offering more absorption than lighter materials like wood and fabric. Thickness also plays a role in sound absorption, with thicker panels providing better absorption than thinner ones. Coverage area is also important, as more panels may be needed to cover larger surfaces or to achieve the desired level of sound absorption.
To ensure optimal sound absorption, it is important to properly hang and place acoustic panels. They should be placed strategically in a room, such as on walls, ceilings, and floors, to cover as much surface area as possible. It is also recommended to use corner traps and bass traps, which are designed to control low-frequency sound waves, to further enhance the effectiveness of acoustic panels.
In conclusion, acoustic panels are a crucial component in creating a home studio environment that promotes high-quality recorded audio. By selecting the right type of panel, considering factors such as material composition and thickness, and properly hanging and placing them, home studio owners can achieve optimal sound absorption and minimize reverberation in their recording space.
Bass Traps
Bass traps are an essential component of any home studio as they help to eliminate unwanted low-frequency sounds that can disrupt the quality of your recordings. Here are some key points to consider when incorporating bass traps into your home studio:
- Placement: Bass traps should be placed in corners of the room where sound reflections tend to accumulate. Ideally, they should be positioned about 6 inches away from the wall and around 50% up the height of the wall.
- Type: There are two main types of bass traps: corner traps and broadband traps. Corner traps are designed specifically for the corners of a room, while broadband traps can be placed in any location and are effective at reducing low-frequency sounds across a wide range of frequencies.
- Material: The most common material used for bass traps is high-density foam, which is both affordable and effective. Other materials, such as mineral wool or fiberglass, can also be used but may require more effort to install.
- Size: The size of the bass trap will depend on the size of the room and the amount of low-frequency sound that needs to be absorbed. A general rule of thumb is to have one bass trap for every 200 cubic feet of space.
- Additional considerations: It’s important to note that bass traps are not a one-size-fits-all solution. The type and placement of bass traps will vary depending on the specific acoustic needs of your home studio. Additionally, it’s recommended to consult with a professional acoustician to ensure that your bass traps are properly installed and positioned for optimal results.
Reflection Filters
When setting up a home studio, it’s crucial to control and minimize reflections to achieve high-quality recordings. Reflection filters are a key component in achieving this goal. Here’s what you need to know:
Reflection filters, also known as acoustic panels or foam, are designed to absorb sound waves and reduce reflections within a room. These filters come in various shapes, sizes, and materials, each with its own set of benefits and drawbacks. Some popular options include:
- Foam panels: Affordable and lightweight, foam panels are a popular choice for home studios. They come in various thicknesses and can be mounted on walls, ceilings, or placed on stands. However, they may not provide the same level of absorption as other materials.
- Wedge-shaped panels: These panels are designed to fit into the corners of a room, where reflections often occur. They are effective at absorbing sound waves in these specific areas, but may not provide as much overall coverage as other options.
- Cloud-shaped panels: Cloud-shaped panels are larger and more substantial than foam panels, providing better absorption. They are often made of denser materials like high-density foam or mineral wool. While they can be more expensive, they offer a more comprehensive solution for controlling reflections.
When selecting reflection filters, consider the size and shape of your room, as well as the type of sound you’re trying to capture. Reflection filters should be placed strategically throughout the room to ensure even sound absorption. If you’re working with a limited budget, foam panels may be a good starting point, but for professional-grade recordings, investing in cloud-shaped panels made of denser materials may be worthwhile.
In addition to reflection filters, other methods for controlling reflections include using diffusors, which scatter sound waves evenly throughout a room, and bass traps, which are designed to absorb low-frequency sound waves. When building your home studio, consider implementing a combination of these techniques to achieve the best possible sound quality.
Soundproofing
Soundproofing is a crucial aspect of building a home studio. It ensures that external noise does not interfere with your recordings and that your recordings do not disturb your neighbors. Here are some steps to take when soundproofing your home studio:
- Identify the sound sources: Start by identifying the sound sources in your home studio, such as your computer, monitors, and audio equipment.
- Isolate the sound sources: Once you have identified the sound sources, you need to isolate them from the rest of the room. This can be done by placing the sound sources on a sturdy and heavy table or by building a separate enclosure for them.
- Treat the walls and ceiling: To reduce the transmission of sound through the walls and ceiling, you can use acoustic panels, bass traps, or mass-loaded vinyl. These materials absorb or block sound waves, reducing the amount of noise that escapes the room.
- Use soundproofing materials: You can also use soundproofing materials such as door seals, window inserts, and room dividers to block external noise and prevent sound from leaking out of the room.
- Test the room: After you have completed the soundproofing, test the room by playing back your recordings and checking for any external noise or leakage. If you can hear noise from outside the room or if the sound is echoing off the walls, you may need to make additional soundproofing adjustments.
By following these steps, you can create a soundproof home studio that allows you to record high-quality audio without disturbing your neighbors or being disturbed by external noise.
Organize Your Workspace
Desk and Chair
When it comes to setting up a home studio, having the right desk and chair is crucial. The right desk should be large enough to accommodate all of your equipment, and it should be sturdy enough to support the weight of your gear. The chair you choose should be comfortable and supportive, as you will be spending a lot of time sitting in it.
Consider the following when choosing a desk and chair for your home studio:
- Size: Make sure the desk is large enough to accommodate all of your equipment, including your computer, monitors, keyboard, and mouse. If you plan on using multiple monitors, you may need a larger desk.
- Material: Look for a desk made of solid wood or metal. These materials are durable and can support the weight of your equipment.
- Style: Choose a desk that fits your personal style. A desk with a clean and modern design will complement any home studio.
- Ergonomics: Make sure the chair is comfortable and supportive. Look for a chair with adjustable height, armrests, and lumbar support.
- Ergonomics: A chair with a comfortable seat and backrest is important for preventing back pain and discomfort.
- Breathability: Consider a chair with a breathable material such as mesh. This will help keep you cool during long recording sessions.
- Durability: Look for a chair that is durable and built to last.
Investing in a good desk and chair will not only make your home studio more comfortable, but it will also improve your productivity and overall experience.
Cables and Connectors
When building a home studio, one of the most crucial aspects to consider is the organization of your workspace. Cluttered cables and connectors can not only look unprofessional, but they can also pose a safety hazard. In this section, we will discuss the essential cables and connectors you will need for your home studio and how to organize them effectively.
One of the most important cables to have in your home studio is an XLR cable. This type of cable is commonly used for microphones and can be used for both recording and live performances. It is important to have a variety of XLR cables in different lengths to accommodate the layout of your workspace.
Another essential cable for your home studio is a USB cable. This type of cable is commonly used for connecting devices such as microphones, audio interfaces, and controllers. It is important to have a variety of USB cables in different lengths and types to accommodate the different devices you will be using in your studio.
In addition to XLR and USB cables, you will also need a variety of connectors such as TRS, TS, and RCA. These connectors are commonly used for connecting different devices and can be found on most audio equipment. It is important to have a variety of connectors in different types and sizes to accommodate the different devices you will be using in your studio.
When organizing your cables and connectors, it is important to keep them tidy and easily accessible. One effective way to do this is to use cable organizers and Velcro cable ties to keep cables bundled together and off the floor. You can also use a cable management system such as a raceway or conduit to run cables along the walls and keep them out of the way.
By taking the time to organize your cables and connectors, you can create a safe and professional-looking workspace that is conducive to creativity and productivity.
Storage Solutions
Creating a home studio requires not only proper equipment but also an organized workspace. One of the most crucial aspects of this process is the storage solutions. Here are some ideas to help you get started:
- Utilize Vertical Space: Consider investing in shelving units or wall-mounted storage solutions to maximize your workspace. This will not only keep your equipment organized but also help you save space.
- DIY Storage Solutions: If you’re on a budget, consider building your own storage solutions. This can include custom-made storage boxes, hanging organizers, or even repurposing old furniture.
- Invest in Storage Containers: Storage containers, such as bins or drawers, can help keep your equipment organized and easily accessible. These can be purchased or made yourself.
- Label Your Equipment: Labeling your equipment can help you quickly locate what you need. This can be especially helpful when working on multiple projects at once.
- Use Baskets and Trays: Baskets and trays can help keep small items organized and easy to access. Consider using them to store cables, microphones, or other small equipment.
By implementing these storage solutions, you can keep your home studio organized and efficient, allowing you to focus on your work without the distraction of clutter.
Lighting and Ventilation
When setting up a home studio, it’s important to consider the lighting and ventilation. Poor lighting and ventilation can lead to discomfort and can affect the quality of your recordings. Here are some key points to keep in mind:
- Lighting:
- Natural light is best, but it’s not always possible to rely on it. Consider investing in LED lights or fluorescent lights to ensure adequate lighting.
- Position your lights so that they are pointing downwards to avoid harsh shadows.
- Adjust the brightness of your lights according to the time of day and the lighting conditions outside.
- Ventilation:
- Proper ventilation is crucial for maintaining a comfortable working environment.
- Install a ventilation system or open windows to ensure that fresh air is circulating in your studio.
- If you’re using a portable recording setup, make sure that you’re in a well-ventilated room to avoid the buildup of noise and heat.
By paying attention to your lighting and ventilation, you can create a comfortable and productive workspace that will enable you to produce high-quality recordings.
Develop Your Skills and Techniques
Recording Tips and Techniques
- Invest in quality equipment: A high-quality microphone is crucial for capturing clear and professional-sounding audio. Consider investing in a large-diaphragm condenser microphone, which can provide a wide frequency response and high sensitivity.
- Choose the right microphone: Different microphones are suited for different purposes. For example, a dynamic microphone is ideal for singing or spoken word, while a ribbon microphone can capture warm and natural-sounding vocals. Research the best microphone for your specific needs and budget.
- Select the right recording software: There are many digital audio workstations (DAWs) available, each with its own set of features and capabilities. Some popular options include Pro Tools, Ableton Live, and Logic Pro X. Experiment with different software to find the one that best suits your needs and workflow.
- Optimize your acoustic environment: A quiet and treated room is essential for achieving high-quality recordings. Invest in acoustic panels or foam to absorb unwanted reflections and reverberation. You may also want to consider a portable vocal booth or isolation shield to minimize external noise.
- Experiment with microphone placement: The position of the microphone can greatly affect the tone and clarity of the recording. Try different mic placements to find the one that best captures your desired sound. Generally, placing the microphone at a 45-degree angle and about 6 inches away from the mouth or instrument yields good results.
- Use high-quality cables and connectors: Investing in high-quality XLR or TRS cables can help minimize noise and interference, ensuring clear and consistent signal flow. Additionally, using a pop filter or windscreen can help reduce popping and breath sounds.
- Practice and experiment: The more you practice recording, the better you will become at capturing high-quality audio. Experiment with different techniques and settings to find what works best for you and your music. Remember, there is no one-size-fits-all approach to recording, so don’t be afraid to try new things and find your own unique sound.
Mixing and Mastering Techniques
Creating a home studio is an exciting journey for any musician or producer. It’s a way to harness your creativity, craft your sound, and share your music with the world. One of the most crucial aspects of building a home studio is mastering the art of mixing and mastering. These techniques will help you achieve professional-sounding recordings that stand out in today’s competitive music industry.
Understanding the Basics of Mixing and Mastering
Mixing and mastering are two distinct processes, but they are closely related. Mixing involves adjusting the levels and balancing the various elements of a multitrack recording to create a cohesive song. Mastering, on the other hand, is the process of optimizing the overall sound of a recording to make it suitable for various playback systems, such as CDs, streaming platforms, and live performances.
Investing in the Right Equipment
To achieve professional-sounding mixes and masters, you need the right equipment. Here are some essential tools every home studio should have:
- A Digital Audio Workstation (DAW) – A DAW is the backbone of your home studio. It’s where you’ll record, mix, and master your music. Popular DAWs include Ableton Live, Logic Pro, and Pro Tools.
- A quality microphone – Investing in a good microphone is crucial, as it will capture your vocals or instrument’s natural sound. Some popular options include the Shure SM58, Rode NT1-A, and Blue Yeti.
- A pair of studio monitors – Studio monitors are designed to provide accurate and uncolored sound reproduction. They will help you make better mixing decisions by revealing the true nature of your mix. Popular studio monitor brands include Yamaha, KRK, and Genelec.
- A mastering processor – A mastering processor is a tool that emulates the features of a professional mastering console. It can help you achieve a polished, radio-ready sound. Popular mastering processors include the T-RackS, Ozone, and Waves L2.
Developing Your Mixing Skills
Mixing is the process of balancing the various elements of a multitrack recording to create a cohesive song. Here are some tips to help you develop your mixing skills:
- Learn the basics of EQ, compression, and reverb – These are the building blocks of mixing. Familiarize yourself with how each effect works and how to use them effectively.
- Experiment with automation – Automation is a powerful tool that allows you to control the level of effects and instruments over time. Use it to add excitement and dynamics to your mix.
- Group your tracks – Grouping your tracks by instrument or vocal can help you control the levels more effectively and make it easier to work with multiple instruments at once.
Developing Your Mastering Skills
Mastering is the process of optimizing the overall sound of a recording to make it suitable for various playback systems. Here are some tips to help you develop your mastering skills:
- Learn the basics of EQ, compression, and limiting – These are the building blocks of mastering. Familiarize yourself with how each effect works and how to use them effectively.
- Experiment with stereo enhancement – Stereo enhancement tools can help you create a wider, more spacious sound. Experiment with different settings to find what works best for your mix.
- Use reference tracks – Reference tracks are recordings that you can use to compare your mix to. They will help you make better mastering decisions by revealing the true nature of your mix.
In conclusion, building a home studio requires patience, dedication, and a willingness to learn. By investing in the right equipment, developing your mixing and mastering skills, and following these tips, you can create professional-sounding recordings that stand out in today’s competitive music industry.
Sound Design and Synthesis
As a music producer, sound design and synthesis are essential skills to master. With the right tools and techniques, you can create unique and captivating sounds that elevate your music productions to new heights. Here are some key aspects to consider when developing your sound design and synthesis skills:
- Choose the right software and hardware: There are countless sound design and synthesis tools available, both software and hardware-based. Research the different options and choose the ones that best suit your needs and budget. Consider factors such as ease of use, versatility, and compatibility with your existing equipment.
- Understand the basics of synthesis: To create unique sounds, you need to understand the basics of synthesis. This includes concepts such as oscillators, filters, envelopes, and modulation. Take the time to learn and master these fundamentals to unlock the full potential of your sound design and synthesis tools.
- Experiment with different synthesis techniques: Don’t be afraid to experiment with different synthesis techniques to create unique and captivating sounds. This might include techniques such as granular synthesis, frequency modulation synthesis, or wavetable synthesis. Experiment with different parameters and settings to discover new sounds and textures.
- Utilize samples and presets: Samples and presets can be a great starting point for your sound design and synthesis projects. However, it’s important to modify and customize these sounds to fit your specific needs and style. Don’t be afraid to modify and manipulate samples and presets to create your own unique sounds.
- Pay attention to sound design details: The smallest details can make a big difference in your sound design and synthesis projects. Pay attention to aspects such as frequency balance, stereo imaging, and dynamics to ensure that your sounds are rich, full, and dynamic.
By following these tips and techniques, you can develop your sound design and synthesis skills and create captivating and unique sounds for your music productions.
Composition and Arrangement Techniques
When building a home studio, it’s important to understand the fundamentals of composition and arrangement techniques. These techniques can help you create a polished and professional-sounding recording.
Creating a Balanced Mix
One of the most important aspects of composition and arrangement is creating a balanced mix. This means ensuring that each instrument or vocal in your recording is present at the right volume level and in the right place within the stereo field.
To achieve a balanced mix, you’ll need to consider the relative loudness of each element and how they interact with one another. For example, if you have a vocal and a guitar playing at the same time, you’ll need to make sure that the vocal is louder than the guitar so that it’s the main focus of the mix.
Panning
Panning is another important aspect of composition and arrangement. Panning refers to the position of a sound within the stereo field, which is the space between the left and right speakers.
By carefully panning sounds, you can create a sense of depth and movement in your mix. For example, you might want to pan a guitar to the left side of the mix to create a sense of space, while keeping a vocal centered in the mix to ensure that it’s the main focus.
Adding Effects
Effects can be a powerful tool for enhancing the overall sound of your mix. Reverb, for example, can help to create a sense of space and depth, while delay can add movement and interest to a sound.
However, it’s important to use effects sparingly and thoughtfully. Too many effects can clutter up your mix and make it sound unbalanced. Instead, focus on using a few well-chosen effects to enhance the overall sound of your recording.
By following these composition and arrangement techniques, you can create a polished and professional-sounding home studio recording.
Stay Up-to-Date with the Latest Technology
Research and Test New Equipment
Creating a home studio requires not only a good understanding of sound engineering principles but also an eye for the latest technology. Investing in new equipment can significantly improve the quality of your recordings, but it is essential to do your research before making any purchases.
One of the best ways to stay up-to-date with the latest technology is to attend trade shows and exhibitions. Here, you can see and hear the latest equipment in action, talk to manufacturers and dealers, and even get hands-on demonstrations.
In addition to attending trade shows, it is also important to read reviews and listen to samples of the equipment you are interested in. There are many online resources available, including forums, blogs, and YouTube channels, where you can find information about different products and compare them with others on the market.
Once you have done your research, it is essential to test the equipment in your home studio before making a purchase. This will help you determine whether the equipment is compatible with your existing setup and whether it will meet your needs. It is also important to consider the cost of the equipment and whether it fits within your budget.
In summary, researching and testing new equipment is an essential part of building a home studio. By staying up-to-date with the latest technology, you can make informed decisions about the equipment you purchase and ensure that your home studio is equipped with the best possible gear.
Attend Workshops and Seminars
- One of the most effective ways to stay up-to-date with the latest technology is by attending workshops and seminars. These events provide a unique opportunity to learn about the latest equipment, software, and techniques in the field of music production.
- By attending workshops and seminars, you can gain hands-on experience with the latest technology, as well as learn from industry experts and experienced professionals. This can help you make informed decisions about the equipment and software you choose to invest in for your home studio.
- Additionally, these events often provide networking opportunities, allowing you to connect with other musicians, producers, and industry professionals. This can be valuable for building relationships and gaining insights into the industry.
- To find workshops and seminars in your area, check with local music schools, production companies, and recording studios. You can also search online for events in your area or in cities that you plan to visit.
- Some popular workshops and seminars include those offered by industry organizations such as the Audio Engineering Society (AES) and the National Association of Music Merchants (NAMM). These events often feature guest speakers, product demonstrations, and panel discussions on topics such as audio engineering, music production, and music business.
- Additionally, many online resources offer tutorials, webinars, and other educational content on topics related to home studio production. These resources can be a valuable source of information and inspiration as you build your home studio.
- By taking advantage of these resources, you can ensure that you are up-to-date with the latest technology and techniques in the field of music production, helping you to create high-quality recordings and build a successful home studio.
Join Online Communities and Forums
When it comes to building a home studio, it’s important to stay up-to-date with the latest technology. One of the best ways to do this is by joining online communities and forums. Here are some reasons why:
- Networking: Online communities and forums provide a platform for you to connect with other professionals in the industry. You can ask questions, share experiences, and learn from others who have already built their own home studios. This can be a great way to get tips and advice on how to improve your own setup.
- Resource Sharing: Many online communities and forums are dedicated to sharing resources such as tutorials, software, and hardware reviews. This can be a great way to find out about new equipment and software that can help you improve your home studio.
- News and Updates: Online communities and forums are also a great way to stay up-to-date with the latest news and updates in the industry. You can find out about new technologies, software updates, and industry events that can help you improve your home studio.
To get started, here are some online communities and forums that you can join:
- The Waves Audio Forum: This forum is dedicated to audio professionals and enthusiasts. It’s a great place to ask questions, share experiences, and learn about new technologies and techniques.
- The Pro Tools Expert Forum: This forum is dedicated to users of Avid’s Pro Tools software. It’s a great place to find tips and tricks, ask questions, and share experiences.
- The Home Recording Forum: This forum is dedicated to home recording enthusiasts. It’s a great place to find advice on building a home studio, as well as discussing audio equipment and software.
By joining these online communities and forums, you can stay up-to-date with the latest technology and connect with other professionals in the industry. This can be a great way to improve your home studio and take your audio production to the next level.
Stay Connected with Industry Professionals
Building a home studio requires a significant investment of time and resources. It is important to stay up-to-date with the latest technology to ensure that you are making the most of your investment. One way to do this is by staying connected with industry professionals. Here are some tips on how to do this:
- Attend Industry Events: Attending industry events such as music festivals, conferences, and trade shows is a great way to stay connected with industry professionals. You can network with other professionals, learn about new technologies, and discover the latest trends in the industry.
- Join Industry Associations: Joining industry associations such as the Audio Engineering Society (AES) or the Recording Academy is another way to stay connected with industry professionals. These organizations offer a range of resources, including training programs, networking opportunities, and access to industry publications.
- Follow Industry Influencers: Following industry influencers on social media platforms such as Twitter and Instagram is a great way to stay up-to-date with the latest trends and developments in the industry. You can follow industry experts, read reviews of new technologies, and get insights into the latest trends.
- Participate in Online Communities: Participating in online communities such as forums and discussion groups is another way to stay connected with industry professionals. You can ask questions, share your experiences, and learn from other professionals in the industry.
By staying connected with industry professionals, you can gain valuable insights into the latest technologies and trends in the industry. This can help you make informed decisions about your home studio setup and ensure that you are making the most of your investment.
FAQs
1. What are the essential components of a home studio?
A home studio typically consists of a few key components, including a computer or laptop, audio recording software, a microphone, headphones, and acoustic treatment for the room. It’s important to have a reliable computer and audio recording software to record and edit your audio. A good quality microphone and headphones are also essential for capturing clear and accurate audio. Finally, acoustic treatment, such as soundproofing materials and acoustic panels, can help to minimize unwanted noise and reflections in the room, improving the overall sound quality of your recordings.
2. What type of microphone should I use in my home studio?
There are many different types of microphones to choose from, including condenser, dynamic, and ribbon microphones. The type of microphone you choose will depend on your budget, the type of recording you’re doing, and the sound you’re trying to achieve. Condenser microphones are often considered the best option for home studios because they are sensitive and versatile, making them well-suited for a wide range of recording applications. Dynamic microphones are also a good option for home studios because they are less expensive and more durable than condenser microphones.
3. How important is acoustic treatment for a home studio?
Acoustic treatment is essential for any home studio. Without proper acoustic treatment, your recordings may suffer from unwanted noise and reflections, which can affect the overall sound quality. Soundproofing materials and acoustic panels can help to minimize unwanted noise and reflections in the room, while also helping to create a more balanced and natural sound. Investing in good quality acoustic treatment is a worthwhile investment for any home studio.
4. What is the best audio recording software for a home studio?
There are many different audio recording software options available, including Pro Tools, Ableton Live, and Logic Pro. The best audio recording software for your home studio will depend on your needs and budget. Some of the most popular audio recording software options include features such as multitrack recording, editing, and mixing, as well as effects processing and mastering. It’s important to choose software that is easy to use and offers the features you need for your specific recording projects.
5. What headphones should I use in my home studio?
Headphones are an essential part of any home studio, as they allow you to monitor your recordings and mixes in real-time. There are many different types of headphones to choose from, including over-ear, on-ear, and in-ear models. Over-ear headphones are often considered the best option for home studios because they provide excellent sound quality and comfort. On-ear headphones are also a good option, as they are less expensive and more portable than over-ear models. In-ear headphones are a good choice for musicians who need to monitor their recordings while on the go.
6. What are the best acoustic treatment options for a home studio?
There are many different acoustic treatment options available for home studios, including soundproofing materials, acoustic panels, and bass traps. Soundproofing materials, such as mass loaded vinyl and acoustic caulk, can help to minimize unwanted noise and reflections in the room. Acoustic panels, made from materials such as foam and fabric, can help to absorb unwanted sound and reflections, while also helping to create a more balanced and natural sound. Bass traps are designed to reduce low-frequency noise and reflections in the room, making them a good option for home studios.
