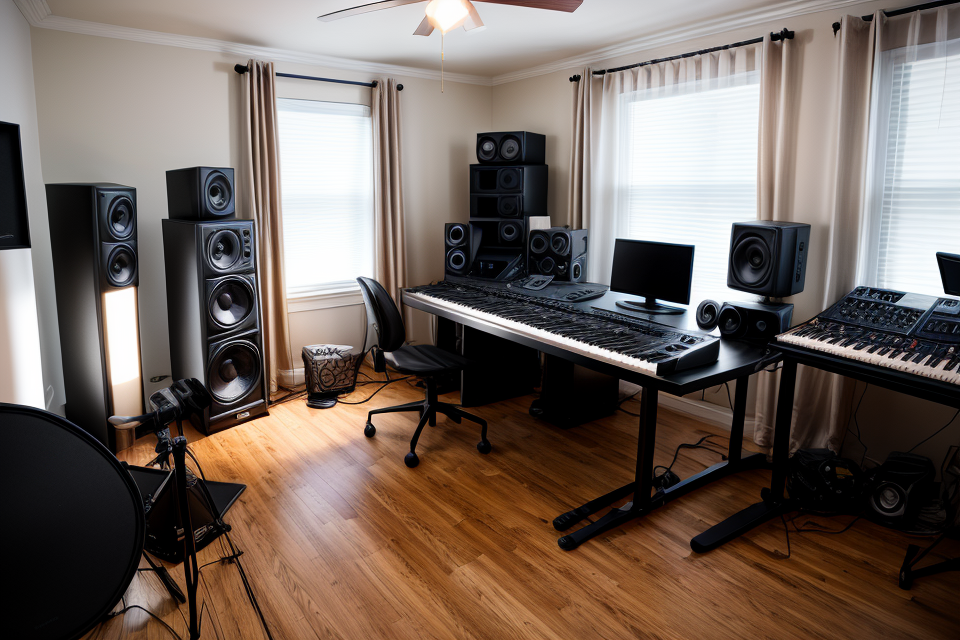
Setting up a home studio can be an exciting yet daunting task for many aspiring musicians, producers, and content creators. With the right equipment and setup, you can turn your living room or bedroom into a professional recording space, capable of producing high-quality audio content. In this comprehensive guide, we will cover everything you need to know to set up a home studio, from essential equipment to soundproofing techniques, and software recommendations. Whether you’re a beginner or an experienced musician, this guide will help you create a home studio that suits your needs and budget. So, let’s get started and explore the world of home recording!
Essential Equipment for a Home Studio
Microphone
A microphone is a crucial component of any home studio setup. It is responsible for capturing and recording your voice or instrument, and it plays a significant role in the overall quality of your recordings. There are several types of microphones available for home studio use, each with its own unique characteristics and advantages. In this section, we will discuss the three main types of microphones: condenser microphone, dynamic microphone, and USB microphone.
- Condenser Microphone
Condenser microphones are known for their ability to capture a wide range of frequencies and produce a clear, detailed sound. They are commonly used for recording vocals, acoustic instruments, and other delicate sounds. Condenser microphones require phantom power to operate, which is a type of electrical current that is supplied by the recording device. They are generally more expensive than other types of microphones but offer high-quality sound and versatility. - Dynamic Microphone
Dynamic microphones are less sensitive than condenser microphones and are designed to handle high sound levels. They are commonly used for recording loud instruments such as electric guitars and drums. Dynamic microphones do not require phantom power and are generally more affordable than condenser microphones. They are also less prone to noise and distortion, making them a good choice for recording in noisy environments. - USB Microphone
USB microphones are designed to be plug-and-play devices that connect directly to a computer via a USB port. They are a popular choice for home studio use because they are easy to set up and do not require any additional audio interface or drivers. USB microphones are available in both condenser and dynamic varieties and are typically more affordable than other types of microphones. They are also portable and easy to transport, making them a good choice for musicians who record on the go.
In conclusion, the type of microphone you choose for your home studio will depend on your specific needs and the type of recording you plan to do. Condenser microphones offer high-quality sound and versatility but require phantom power, while dynamic microphones are more affordable and durable but may not capture as much detail. USB microphones are a convenient and affordable option for those who want an easy and portable solution.
Headphones
Headphones are a crucial component of any home studio setup. They allow you to listen to your recordings with precision and clarity, helping you to identify and correct any issues with your audio. When choosing headphones for your home studio, there are several factors to consider.
- Closed-back headphones: Closed-back headphones are designed to reduce external noise and prevent sound from leaking out. They are ideal for recording and mixing as they provide a more accurate representation of your audio. Closed-back headphones can also help to prevent distortion and ensure that your recordings sound clear and precise.
- Open-back headphones: Open-back headphones are designed to be more comfortable than closed-back headphones, as they do not put as much pressure on your ears. They are also less expensive than closed-back headphones. However, open-back headphones are not as effective at blocking out external noise, and they can leak sound out. This means that they are not ideal for recording and mixing, as they can cause distortion and interference with your audio.
- Over-ear headphones: Over-ear headphones are designed to be comfortable and provide good sound quality. They are often used for casual listening and are not ideal for recording and mixing. Over-ear headphones can be less precise than closed-back headphones, and they may not provide the same level of detail.
In summary, when choosing headphones for your home studio, it is important to consider the type of headphones that will best meet your needs. Closed-back headphones are ideal for recording and mixing, while open-back headphones are less expensive but less effective at blocking out external noise. Over-ear headphones are best suited for casual listening and may not provide the same level of detail as closed-back or open-back headphones.
Audio Interface
An audio interface is a crucial component of any home studio setup. It serves as the bridge between your musical instruments, microphones, and your computer. The audio interface converts analog signals from your instruments and microphones into digital signals that your computer can understand, and vice versa. In this section, we will discuss the different types of audio interfaces available for home studio setups.
Bus-powered audio interface
A bus-powered audio interface is a type of audio interface that uses the USB port on your computer to power itself. These interfaces are affordable and easy to set up, making them a popular choice for beginners. They are also portable, so you can take them with you when you travel. However, they may not have as many features as other types of audio interfaces, and their audio quality may not be as high.
Portable audio interface
A portable audio interface is a type of audio interface that is designed to be used on the go. They are typically smaller and lighter than other types of audio interfaces, making them easy to carry in a backpack or bag. They are also usually bus-powered, meaning they can be powered via USB. Portable audio interfaces are perfect for musicians who want to record on the go or for podcasters who want to record interviews in different locations.
Large audio interface
A large audio interface is a type of audio interface that is designed for professional home studio setups. They are typically more expensive than other types of audio interfaces, but they offer a higher audio quality and more features. They may have more input and output channels, better preamps, and more advanced software. Large audio interfaces are ideal for musicians who want to record multiple instruments and vocals at once, or for producers who want to create complex music productions.
Acoustic Treatment
Acoustic treatment is a crucial aspect of setting up a home studio. It involves using various materials and techniques to control and improve the acoustics of your recording space. Proper acoustic treatment can help to reduce echo, reverb, and other unwanted sound reflections, which can negatively impact the quality of your recordings.
Here are some essential acoustic treatment tools and techniques to consider when setting up your home studio:
- Acoustic panels: These are soft, fabric-covered panels that are designed to absorb sound waves. They are typically placed on walls, ceilings, and floors to help reduce reflections and improve the overall acoustics of the room. Different types of acoustic panels are available, each with its own unique characteristics and properties. For example, some panels are designed to absorb high-frequency sounds, while others are better suited for absorbing low-frequency sounds.
- Soundproofing materials: Soundproofing materials are used to block or absorb sound waves, preventing them from escaping or entering your recording space. These materials can be used to create a soundproof booth or isolation chamber within your home studio, or to prevent sound from leaking into neighboring rooms. Examples of soundproofing materials include mass-loaded vinyl, acoustic caulk, and soundproof drywall.
- Bass traps: Bass traps are designed specifically to absorb low-frequency sounds, such as bass notes and kick drums. They are typically placed in corners of the room, where sound reflections can be particularly problematic. Bass traps can be made from a variety of materials, including foam, fiberglass, and fabric.
By using these acoustic treatment tools and techniques, you can create a home studio environment that is conducive to high-quality recording. It’s important to note that the specific acoustic treatment needs of your home studio will depend on a variety of factors, including the size and shape of your room, the type of music you’re recording, and the equipment you’re using. Consulting with a professional acoustician or sound engineer can be helpful in determining the best acoustic treatment strategy for your home studio.
Other Essential Accessories
In addition to the microphone, pop filter, and headphones, there are several other essential accessories that can help you set up a professional-sounding home studio.
- Pop filter: A pop filter is a must-have accessory for any home studio. It helps to reduce unwanted sounds such as popping and hissing that can occur when recording vocals. A pop filter is a small screen that attaches to the microphone and helps to filter out these unwanted sounds.
- Microphone arm: A microphone arm is a great accessory to have if you want to position your microphone in different locations. It allows you to adjust the height and angle of your microphone, making it easier to achieve the perfect recording position.
- Headphone stand: A headphone stand is a useful accessory if you want to position your headphones in a convenient location. It allows you to place your headphones in a comfortable position, making it easier to listen to your recordings and make adjustments as needed.
By investing in these essential accessories, you can ensure that your home studio is set up for success and that you are able to produce high-quality recordings with ease.
Choosing the Right Equipment for Your Home Studio
Determine Your Budget
When setting up a home studio, it’s important to determine your budget before purchasing any equipment. This will help you narrow down your options and ensure that you get the best value for your money. Here are some guidelines to help you determine your budget:
- Under $100
- If you’re on a tight budget, you can still set up a basic home studio by investing in essential equipment such as a microphone, audio interface, and headphones. You may need to compromise on quality to stay within this budget range, but you can still achieve decent results.
- $100-$500
- This budget range offers a good balance between quality and affordability. You can invest in better quality equipment such as a USB microphone, midi keyboard, and studio monitors. You may still need to make some compromises, but you’ll be able to create a more professional-sounding home studio.
- Over $500
- If you have a larger budget, you can invest in high-quality equipment that will produce professional-grade recordings. This budget range allows you to purchase top-of-the-line microphones, audio interfaces, studio monitors, and other equipment that will give you the best possible sound quality. With this budget, you can create a home studio that rivals professional recording studios.
Consider Your Recording Needs
When setting up a home studio, it’s important to consider the specific recording needs that you have. This includes the types of instruments or vocals that you’ll be recording, as well as any other recording needs you may have, such as podcasting. By taking these needs into account, you can ensure that you have the right equipment to get the job done.
- Vocals
- When it comes to recording vocals, there are a few key pieces of equipment that you’ll need. These include a microphone, a preamp or audio interface, and a digital audio workstation (DAW) software.
- The type of microphone you choose will depend on your budget and the quality of sound you’re looking for. Some popular options include condenser microphones, dynamic microphones, and USB microphones.
- A preamp or audio interface is necessary for getting a clean signal from your microphone into your computer. This will allow you to adjust the levels and add effects to your recordings.
- DAW software is where you’ll do all of your recording, mixing, and mastering. Some popular options include Ableton Live, Logic Pro, and Pro Tools.
- Instruments
- Recording instruments such as guitars, basses, and drums will require different equipment than recording vocals. For example, you’ll need instrument-specific microphones, such as dynamic microphones for drums or condenser microphones for acoustic guitars.
- You may also need amplifiers and direct boxes to get a clean signal from your instruments.
- Podcasting
- If you’re planning on recording podcasts, you’ll need equipment that can handle audio recording and editing. This may include a mixer, a digital audio recorder, and editing software.
- A mixer will allow you to control the levels of multiple audio sources, while a digital audio recorder will allow you to record high-quality audio on the go.
- Editing software will allow you to edit and refine your recordings, add effects, and mix multiple audio tracks together. Some popular options include Adobe Audition, Hindenburg Journalist, and GarageBand.
Evaluate Your Space
When setting up a home studio, it’s important to evaluate your space before making any purchases. The size, shape, and location of the room can all impact the sound quality of your recordings.
Room Size
The size of your room is an important factor to consider when setting up a home studio. A larger room will generally provide better sound quality, as there is more space for sound to reverberate and dissipate. However, a larger room may also be more difficult to treat and may require more equipment to achieve the desired sound.
Room Shape
The shape of your room can also impact the sound quality of your recordings. For example, a rectangular room with parallel walls can create echoes and reflections that can degrade the sound quality. On the other hand, a room with angled walls or a lot of curves can help to diffuse sound and reduce echoes.
Room Location
The location of your room can also affect the sound quality of your recordings. For example, a room located near a busy street or next to a loud appliance may pick up unwanted noise and interfere with your recordings. On the other hand, a room located in a quiet part of your home or away from external noise sources may provide better sound quality.
Overall, evaluating your space is an important step in setting up a home studio. By considering the size, shape, and location of your room, you can make informed decisions about the equipment you need to achieve the desired sound quality.
Evaluate Your Technical Skills
Before you begin setting up your home studio, it’s important to evaluate your technical skills. This will help you determine what equipment you’ll need and ensure that you’re able to use it effectively. Here are some key factors to consider:
- Recording experience: If you’re new to recording, you may need to invest in some basic equipment such as a microphone and audio interface. If you have more experience, you may be able to get away with a fewer number of pieces of equipment, but still need to ensure that you have a good quality microphone.
- Audio editing skills: Depending on your audio editing skills, you may need to invest in software such as Pro Tools or Ableton Live to edit and mix your recordings. These programs can be expensive, so it’s important to weigh the cost against the value they’ll bring to your recordings.
- Computer literacy: In order to use many of the tools and software required for recording and editing, you’ll need to have a basic understanding of computer systems and how they work. If you’re not familiar with computers, you may want to invest in a book or online course to help you get up to speed.
It’s important to keep in mind that having the right equipment is only one part of setting up a successful home studio. You’ll also need to consider factors such as room acoustics, isolation, and noise reduction to ensure that your recordings sound professional.
Setting Up Your Home Studio
Selecting the Perfect Location
Selecting the perfect location for your home studio is crucial for achieving high-quality sound recordings. There are several factors to consider when choosing a location, including noise, vibrations, and room acoustics.
Avoiding Noise
Noise can be a significant problem when setting up a home studio. It is essential to choose a location that is as quiet as possible to avoid interference with your recordings. This means finding a room that is located away from high-traffic areas, such as the street or other noisy rooms in the house. Ideally, the room should be soundproofed to prevent any external noise from entering the space.
Avoiding Vibrations
Vibrations can also be a problem when setting up a home studio. It is important to find a location that is free from vibrations to ensure that your recordings are not affected by any unwanted sounds. This means avoiding rooms with heavy machinery or appliances, such as washing machines or dryers, as they can cause vibrations that can interfere with your recordings.
Choosing a Quiet Room
When selecting a location for your home studio, it is important to choose a quiet room that is free from noise and vibrations. This means finding a room that is located away from any sources of noise or vibration, such as the street, other noisy rooms in the house, or heavy machinery. Ideally, the room should be soundproofed to prevent any external noise from entering the space.
In addition to being quiet, the room should also have good acoustics. This means that it should have a neutral sound, with no significant echo or reverberation. It is also important to consider the size of the room, as a smaller room can create a more intimate sound, while a larger room can create a more spacious sound.
Overall, selecting the perfect location for your home studio is crucial for achieving high-quality sound recordings. By avoiding noise, vibrations, and selecting a quiet room with good acoustics, you can ensure that your recordings are of the highest quality possible.
Placing Your Equipment
Placing your equipment is an essential aspect of setting up a home studio. It can significantly impact the quality of your recordings. In this section, we will discuss the placement of your microphone, headphones, and audio interface.
Microphone Placement
The placement of your microphone is crucial for capturing high-quality audio. Here are some tips for placing your microphone:
- Position the microphone at a 90-degree angle from the sound source.
- Keep the microphone about 6 inches away from the sound source.
- Avoid placing the microphone too close to walls, ceilings, or other reflective surfaces.
Headphone Placement
Headphone placement is also essential when setting up a home studio. Proper placement can help you monitor your recordings accurately and make adjustments as needed. Here are some tips for placing your headphones:
- Position your headphones so that they are comfortable and not too tight.
- Place your headphones directly on your ears or use an earpad to improve comfort.
- Avoid placing your headphones too close to your monitors or other speakers.
Audio Interface Placement
The placement of your audio interface is also important when setting up a home studio. Proper placement can help you avoid audio latency and improve the overall quality of your recordings. Here are some tips for placing your audio interface:
- Position your audio interface near your computer or other recording device.
- Avoid placing your audio interface too close to other electronic devices or sources of interference.
- Keep your audio interface away from the floor or other surfaces that can reflect sound.
In summary, proper placement of your microphone, headphones, and audio interface is crucial for setting up a home studio. By following these tips, you can ensure that your recordings are of high quality and free from unwanted interference.
Calibrating Your Equipment
To set up a home studio, one of the most crucial steps is to calibrate your equipment. This includes audio interface settings, headphone settings, and microphone settings. Here’s a breakdown of each:
Audio Interface Settings
Your audio interface is the device that connects your microphone and instruments to your computer. To calibrate it, follow these steps:
- Connect your audio interface to your computer.
- Open your DAW (Digital Audio Workstation) and go to the settings or preferences.
- Look for the audio input and output settings.
- Make sure the audio interface is selected as the input and output device.
- Check the input levels to ensure they are not too high or too low.
Headphone Settings
Calibrating your headphones is essential to ensure that you hear everything accurately. Here’s how to do it:
- Put on your headphones and close your eyes.
- Play a test tone or a reference track.
- Adjust the volume until the tone sounds as loud as possible without distorting.
- Check for any volume inconsistencies between the left and right channels.
Microphone Settings
Microphone settings are crucial for getting the best sound quality from your recordings. Here’s how to calibrate your microphone:
- Connect your microphone to your audio interface.
- Open your DAW and go to the settings or preferences.
- Look for the microphone settings.
- Check the input levels to ensure they are not too high or too low.
- Adjust the sensitivity or gain to ensure that the signal is strong enough without causing distortion.
By following these steps, you can ensure that your equipment is properly calibrated, and you’ll be able to create high-quality recordings from the comfort of your own home.
Optimizing Your Acoustics
Creating the perfect acoustic environment is essential for a high-quality home studio recording experience. Poor acoustics can lead to unwanted echoes, reverberation, and noise that can ruin your recordings. To optimize your acoustics, consider implementing the following solutions:
Using Acoustic Panels
Acoustic panels are a popular and effective way to absorb unwanted sound reflections and reduce echo in your home studio. These panels are typically made of high-density foam or mineral wool and come in various sizes and colors.
Position the acoustic panels strategically in your studio to cover areas where sound reflections are most likely to occur, such as corners, walls, and ceilings. For best results, consult with an acoustician or use an acoustic panel placement tool to guide you in placing the panels correctly.
Using Soundproofing Materials
In addition to acoustic panels, soundproofing materials can help minimize external noise and prevent sound from escaping your studio. These materials can include mass-loaded vinyl, acoustic caulk, and door seals.
Apply mass-loaded vinyl to your studio walls, doors, and windows to reduce sound transmission. Use acoustic caulk to fill gaps and cracks where sound can leak out. Install door seals on your studio doors to block noise from entering or leaving the room.
Using Bass Traps
Bass traps are designed to absorb low-frequency sound waves that can cause booming and resonance in your studio. These traps are typically made of dense materials like foam or mineral wool and are installed in corners or along walls.
Position the bass traps in areas where low-frequency sounds tend to accumulate, such as corners or where walls meet the ceiling. Experiment with different placements to find the optimal location for your specific studio space.
By implementing these solutions, you can optimize your home studio’s acoustics and create a more controlled and professional recording environment.
Recording in Your Home Studio
Recording Vocals
Recording vocals is an essential aspect of setting up a home studio. Here are some essential components to consider when recording vocals:
Microphone Technique
The microphone technique is critical when recording vocals. A good microphone technique will ensure that your vocals sound clear and professional. Here are some tips to consider:
- Position the microphone correctly: The microphone should be positioned about 6 inches away from your mouth, and angled slightly upwards to capture your voice’s natural warmth.
- Use a pop filter: A pop filter is a screen that prevents plosive sounds (such as “p” and “b”) from hitting the microphone and causing unwanted noise.
- Monitor your levels: Make sure to monitor your levels as you record to avoid clipping, which can result in distorted audio.
Headphone Monitoring
Headphone monitoring is essential when recording vocals. It allows you to hear your voice clearly and make adjustments as needed. Here are some tips to consider:
- Use a good pair of headphones: Invest in a good pair of closed-back headphones to avoid bleed (when sound from one ear leaks into the other).
- Monitor your levels: Make sure to monitor your levels as you record to avoid any unexpected surprises later on.
- Use reference tracks: Use reference tracks to compare your voice to and ensure that your vocals sound clear and professional.
Recording Software
Recording software is an essential component of setting up a home studio. Here are some essential components to consider when recording vocals:
- Choose the right software: There are many recording software options available, including Audacity, Pro Tools, and Logic Pro. Choose the software that best suits your needs and budget.
- Learn the basics: Take the time to learn the basics of your recording software to ensure that you can use it effectively.
- Use effects wisely: Use effects such as compression and reverb to enhance your vocals, but be careful not to overdo it.
Recording Instruments
Recording instruments in your home studio is an essential aspect of producing high-quality audio recordings. Here are some key considerations to keep in mind when recording instruments in your home studio:
- Microphone technique:
- The type of microphone you use will greatly impact the quality of your recordings. Some popular options for recording instruments include condenser microphones, dynamic microphones, and ribbon microphones.
- The placement of the microphone is also crucial. Experiment with different positions to find the best sound for your instrument.
- Pay attention to the distance between the microphone and the instrument. Too close and you may get a boomy sound, too far away and the sound may be thin.
- Recording software:
- The recording software you use can greatly affect the quality of your recordings. Popular options include Pro Tools, Ableton Live, and Logic Pro.
- Consider the features and capabilities of each software before making a decision. Some software may be better suited for certain types of instruments or genres of music.
- Audio interface settings:
- An audio interface is a device that allows you to connect your instruments and microphones to your computer.
- Make sure your audio interface is properly configured and set up before starting your recording session.
- Consider the sample rate, bit depth, and other settings to ensure the best possible audio quality.
Recording Podcasts
If you’re interested in recording podcasts from the comfort of your own home, there are a few key components you’ll need to set up a functional home studio. These include:
The first step in recording high-quality podcasts is to invest in a good microphone. There are a variety of microphones available on the market, ranging from affordable USB microphones to professional-grade condenser microphones. It’s important to choose a microphone that’s appropriate for your budget and recording needs.
Once you have your microphone, it’s important to understand proper microphone technique. This includes positioning the microphone correctly, adjusting the gain settings, and minimizing background noise. Proper microphone technique can make a significant difference in the quality of your recordings.
Next, you’ll need to choose recording software that’s compatible with your microphone and computer. There are a variety of recording software options available, ranging from free software like Audacity to more advanced software like Adobe Audition.
It’s important to choose recording software that’s easy to use and provides the features you need for your specific recording needs. Some features to consider include the ability to edit and mix audio, add effects and filters, and export your recordings in a variety of formats.
Once you have your microphone and recording software set up, it’s important to understand how to configure your audio interface settings. An audio interface is a device that connects your microphone to your computer and allows you to record audio.
Audio interface settings can affect the quality of your recordings, so it’s important to understand how to configure your settings correctly. This may include adjusting the input levels, monitoring your audio in real-time, and testing your audio to ensure it’s being recorded correctly.
Overall, setting up a home studio for recording podcasts requires careful consideration of the equipment and software you’ll need, as well as proper microphone technique and audio interface settings. With the right tools and knowledge, you can create high-quality podcasts from the comfort of your own home.
Tips for Getting Great Recordings
Warm up your voice
Before you start recording, it’s important to warm up your voice. This can help prevent strain and injury, and ensure that you sound your best. Here are some simple exercises you can try:
- Humming: Humming through your range can help loosen up your vocal cords and get your voice ready for recording.
- Lip trills: Lip trills involve rapidly moving your lips back and forth to create a buzzing sound. This can help increase your vocal range and improve your tone.
- Vocal scales: Singing through your range using scales can help warm up your voice and get you ready for recording.
Use high-quality cables
The cables you use can have a big impact on the quality of your recordings. High-quality cables can help reduce noise and interference, which can improve the clarity and sound quality of your recordings. Look for cables that are made with high-quality materials and that have low capacitance and inductance.
Practice, practice, practice
Like any skill, recording takes practice. The more you practice, the better you’ll get. Set aside time each day to practice recording and experimenting with different techniques. Don’t be afraid to make mistakes or try new things. The more you practice, the more confident you’ll become, and the better your recordings will sound.
FAQs
1. What are the essential components of a home studio?
An essential component of a home studio is a computer or laptop with a fast processor and sufficient RAM. Additionally, you will need a high-quality microphone, a digital audio workstation (DAW) software, and a set of headphones or studio monitors. Other necessary equipment includes a MIDI controller, audio interface, and a high-quality microphone stand.
2. What type of microphone should I use for my home studio?
There are several types of microphones that you can use for your home studio, including condenser microphones, dynamic microphones, and USB microphones. Condenser microphones are known for their accuracy and sensitivity, making them ideal for recording vocals and acoustic instruments. Dynamic microphones, on the other hand, are more durable and suitable for recording loud instruments. USB microphones are easy to use and perfect for beginners.
3. What is the best DAW software for a home studio?
The best DAW software for a home studio depends on your needs and preferences. Some of the most popular DAW software includes Ableton Live, Logic Pro, and FL Studio. These software programs are user-friendly, offer a wide range of features, and are compatible with various operating systems. It is essential to choose a DAW that aligns with your musical style and production goals.
4. What are the best headphones or studio monitors for a home studio?
The best headphones or studio monitors for a home studio are those that provide accurate sound reproduction and are comfortable to wear for extended periods. Some of the top brands include Audio-Technica, Sennheiser, and Beyerdynamic. Studio monitors are more expensive than headphones but provide a more accurate representation of the audio signal. It is crucial to invest in high-quality audio equipment to ensure that your recordings sound professional.
5. How do I set up my home studio for optimal sound quality?
To set up your home studio for optimal sound quality, you should start by treating your room with acoustic panels or foam to minimize echo and reflections. Next, you should place your speakers or headphones in an optimal position for accurate sound reproduction. Additionally, you should use high-quality cables and connectors to minimize signal loss and ensure a clean sound. Finally, you should invest in a good audio interface to improve the quality of your recordings.
