Are you a musician looking to record your own songs but don’t have the budget for a professional recording studio? Don’t worry, you can still have your own home recording studio with a little creativity and some basic equipment. In this article, we will guide you through the process of setting up your own home recording studio on a budget. We’ll cover everything from the essential equipment you’ll need to the tips and tricks for getting the best sound quality. So, grab a pen and paper, and let’s get started on your journey to becoming a home recording studio pro!
What is a home recording studio?
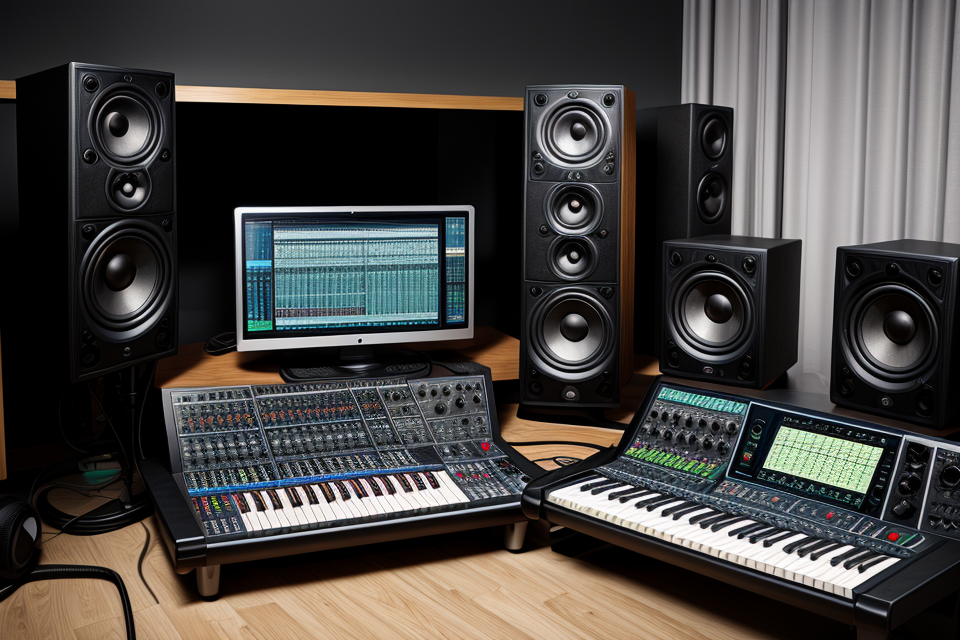
What equipment do you need?
Setting up a home recording studio can be an exciting endeavor for aspiring musicians, producers, and sound engineers. While high-end studios can cost thousands of dollars, setting up a home recording studio on a budget is entirely possible. In this section, we will explore the essential equipment needed to get started with a home recording studio.
Hardware
- Computer: A reliable computer with enough processing power and storage is crucial for recording and producing music. A desktop computer with a fast processor and plenty of RAM is recommended.
- Audio interface: An audio interface is responsible for converting analog audio signals into digital signals that can be recorded and edited on a computer. A basic audio interface with at least two inputs and outputs is sufficient for a home recording studio.
- Microphone: A high-quality microphone is essential for capturing clear and accurate audio recordings. A large-diaphragm condenser microphone is a popular choice for recording vocals and acoustic instruments.
- Headphones: A good pair of headphones is necessary for monitoring recordings and mixing tracks. Over-ear, closed-back headphones with a flat frequency response are recommended.
- Instruments: Depending on the type of music you want to record, you may need instruments such as guitars, basses, drums, or keyboards. Start with the basics and add more instruments as needed.
Software
- Digital audio workstation (DAW): A DAW is software used for recording, editing, and producing music. Popular DAWs include Ableton Live, Logic Pro, and FL Studio. Most DAWs offer free trials or entry-level versions that are suitable for a home recording studio.
- Plugins: Plugins are software applications that can be used within a DAW to enhance the recording and production process. Examples of essential plugins include equalizers, compressors, reverb, and delay. Many plugins are available for free or at a low cost.
Cables and Connectors
- Cables and connectors: High-quality cables and connectors are necessary for ensuring clear and reliable audio signals. Purchase cables with the right connectors for your audio interface and microphone.
Setting up a home recording studio on a budget requires careful consideration of the essential equipment. With the right hardware and software, you can start recording and producing music from the comfort of your own home.
How much does it cost?
When it comes to setting up a home recording studio, one of the first questions that comes to mind is how much it will cost. The good news is that with advancements in technology, it is now possible to set up a home recording studio on a budget. Here are some of the costs you can expect when setting up your own home recording studio:
Equipment Costs:
- Microphone: A high-quality microphone is essential for recording audio. You can find decent microphones for as low as $50, but if you want professional-grade equipment, you may need to spend upwards of $200.
- Audio interface: An audio interface is used to connect your microphone to your computer. A basic audio interface can cost around $50, while a professional-grade one can cost upwards of $500.
- Headphones: A good pair of headphones is crucial for monitoring your recordings. You can find decent headphones for around $50, but high-end headphones can cost upwards of $500.
- Cables and connectors: You will need cables and connectors to connect your equipment together. These can range in cost from $10 to $50.
Software Costs:
- Digital audio workstation (DAW) software: A DAW is used to record, edit, and mix your audio. Some popular DAWs include Ableton Live, Logic Pro, and Pro Tools. You can find basic DAW software for around $50, while professional-grade software can cost upwards of $200.
- Plugins and virtual instruments: Plugins and virtual instruments are used to enhance your recordings. Some popular plugins include compression, reverb, and EQ. You can find basic plugins for around $20, while high-end plugins can cost upwards of $200.
Other Costs:
- Acoustic treatment: If you want to create a professional-sounding recording, you may need to invest in acoustic treatment for your recording space. This can include soundproofing, absorption panels, and diffusion materials. The cost of acoustic treatment can vary depending on the size of your space and the level of treatment needed.
- Furniture and accessories: You may also need to purchase furniture and accessories for your recording space, such as a desk, chair, and lighting. The cost of these items can vary depending on your needs and preferences.
Overall, the cost of setting up a home recording studio can vary widely depending on your needs and budget. However, with careful planning and research, it is possible to set up a high-quality recording studio without breaking the bank.
How to set up your home recording studio on a budget
Setting up a home recording studio on a budget is possible with careful planning and research. By choosing the right room, selecting the best equipment, utilizing existing resources, and considering your budget, you can create high-quality recordings without breaking the bank. Additionally, it’s important to consider factors such as acoustics, noise level, size, and lighting when setting up your home recording studio. By following these tips, you can create professional-sounding recordings that rival those made in professional studios.
Choose the right room
Choosing the right room is crucial for setting up a home recording studio on a budget. Here are some factors to consider when selecting the room:
- Acoustics: The room should have good acoustics, with minimal echo and reverb. You can test the room’s acoustics by clapping your hands and listening to the sound. If the room has a boxy or dull sound, you may need to add some acoustic treatment, such as soundproofing material or acoustic panels.
- Noise level: The room should be quiet and free from external noise. If you live in a noisy area, consider soundproofing the room or recording during quiet hours.
- Size: The room should be large enough to accommodate your recording equipment and instruments, but not so large that it becomes difficult to manage reflections and reverberation. A room that is too small may result in a “boxy” sound, while a room that is too large may cause sound to dissipate too quickly, leading to poor sound quality.
- Lighting: Good lighting is essential for a comfortable recording environment. Consider investing in LED lights or natural light from windows to ensure adequate lighting.
- Equipment: Ensure that the room has enough power outlets to accommodate your recording equipment. You may also need to consider the placement of your equipment to ensure optimal sound quality.
By taking these factors into consideration, you can choose the right room for your home recording studio and create a high-quality recording environment on a budget.
Select the best equipment
Selecting the best equipment is crucial when setting up a home recording studio on a budget. With the right equipment, you can create high-quality recordings without breaking the bank. Here are some tips to help you select the best equipment for your home recording studio:
- Microphone: A high-quality microphone is essential for recording clear and accurate sound. There are several types of microphones available, including dynamic, condenser, and ribbon microphones. Condenser microphones are the most popular choice for home recording studios because they provide a wide frequency range and accurate sound reproduction. However, they can be expensive, so it’s essential to set a budget before purchasing one.
- Audio interface: An audio interface is used to connect your microphone and other audio equipment to your computer. It converts analog audio signals into digital signals that your computer can understand. An audio interface with at least two input channels is recommended for recording multiple instruments or vocals simultaneously. Brands like Focusrite, PreSonus, and Native Instruments offer affordable audio interfaces that provide high-quality sound.
- Headphones: A good pair of headphones is necessary for monitoring your recordings and mixing tracks. Over-ear headphones provide better sound quality and isolation than earbuds, making them a better choice for home recording studios. Brands like Audio-Technica, Sennheiser, and Beyerdynamic offer affordable over-ear headphones that provide clear and accurate sound.
- Digital audio workstation (DAW): A DAW is software used to record, edit, and mix audio tracks. There are several free and affordable DAWs available, including Audacity, GarageBand, and LMMS. These DAWs offer a wide range of features and plugins that can help you create professional-sounding recordings.
- Acoustic treatment: Acoustic treatment is essential for controlling room resonance and reducing external noise. There are several affordable acoustic treatments available, including foam panels, bass traps, and soundproofing materials. These treatments can help improve the overall sound quality of your recordings.
By following these tips, you can select the best equipment for your home recording studio without breaking the bank. With the right equipment, you can create high-quality recordings that rival those made in professional studios.
Utilize your existing resources
If you’re looking to set up a home recording studio on a budget, one of the best ways to save money is by utilizing your existing resources. Here are some ways you can do this:
- Use your smartphone or tablet as a portable recording device: Smartphones and tablets have high-quality microphones and recording apps that can be used to record vocals, guitar, or other instruments. They are also portable, making them great for recording on the go.
- Reuse old equipment: If you have any old audio equipment, such as microphones, cables, or audio interfaces, you can repurpose them for your home recording studio. Make sure to test them to ensure they still work properly before using them.
- Use free software: There are many free digital audio workstations (DAWs) available, such as Audacity, GarageBand, and LMMS, that you can use to record, mix, and master your music. These programs also offer a variety of effects and plugins to enhance your recordings.
- Utilize online resources: There are many online resources available, such as YouTube tutorials and forums, that can help you learn how to set up and use your home recording studio. You can also find free samples and loops online to use in your recordings.
By utilizing your existing resources, you can save money and still create high-quality recordings in your home recording studio.
Consider your budget
When setting up a home recording studio on a budget, it’s essential to consider your budget. Here are some key points to keep in mind:
- Establish a budget: Determine how much you can afford to spend on your home recording studio. Consider your financial situation, and set a realistic budget that you can stick to.
- Prioritize your spending: Decide which equipment and tools are the most essential for your recording needs. Prioritize your spending on the most critical equipment and tools first, and gradually add more items to your studio as your budget allows.
- Look for deals and discounts: Keep an eye out for deals and discounts on recording equipment and software. Check online marketplaces, social media groups, and forums for bargains and sales. You may be able to find high-quality equipment at a fraction of the cost.
- DIY solutions: Consider building your own equipment or modifying existing equipment to save money. For example, you can build your own microphone stands or cables, or repurpose old hardware to create new recording tools.
- Rent or borrow equipment: If you don’t want to invest in expensive equipment, consider renting or borrowing equipment from friends or online rental services. This can help you save money while still getting the equipment you need for your recording studio.
By considering your budget and using these strategies, you can set up a home recording studio without breaking the bank.
Tips for recording high-quality audio
Choose the right microphone
When it comes to recording high-quality audio, choosing the right microphone is crucial. There are many types of microphones available, each with its own unique characteristics and capabilities. Here are some tips to help you choose the right microphone for your home recording studio:
- Consider your budget: The first thing to consider when choosing a microphone is your budget. Microphones can range from affordable to expensive, so it’s important to determine how much you’re willing to spend before making a purchase.
- Understand the different types of microphones: There are several types of microphones, including dynamic, condenser, and ribbon microphones. Each type has its own strengths and weaknesses, so it’s important to understand the differences before making a purchase.
- Consider the polar pattern: The polar pattern of a microphone determines how it picks up sound. Some microphones are omnidirectional, meaning they pick up sound from all directions, while others are unidirectional or bidirectional, meaning they only pick up sound from certain directions. Choose a microphone with a polar pattern that matches your recording needs.
- Think about the application: Different microphones are best suited for different applications. For example, a dynamic microphone is great for recording vocals or instruments, while a condenser microphone is better for recording acoustic instruments or ensembles.
- Consider the microphone’s frequency response: The frequency response of a microphone refers to the range of frequencies it can pick up. Some microphones are better suited for certain types of instruments or voices, so it’s important to choose a microphone with a frequency response that matches your recording needs.
- Look for reviews and recommendations: Finally, it’s always a good idea to read reviews and seek recommendations from other musicians or audio engineers before making a purchase. This can help you make an informed decision and ensure that you’re getting the best microphone for your needs and budget.
Optimize your recording environment
When it comes to recording high-quality audio, the environment in which you record can make a significant difference. Here are some tips to optimize your recording environment:
- Choose the right room: The room you choose to record in can have a big impact on the quality of your recordings. Ideally, you want a room that is quiet, has minimal external noise, and has good acoustics. If possible, try to find a room with minimal echo or reverberation.
- Use soundproofing materials: Even if you choose a quiet room, you may still need to use soundproofing materials to reduce external noise and reflections. You can use items such as acoustic panels, foam, or blankets to help absorb sound and reduce reflections.
- Choose the right equipment: In addition to optimizing your recording environment, the equipment you use can also make a big difference in the quality of your recordings. You will need a high-quality microphone, audio interface, and headphones to achieve the best results.
- Consider the positioning of your equipment: The positioning of your equipment can also affect the quality of your recordings. Make sure to place your microphone in a good location, away from any sources of external noise or reflections. Additionally, make sure to use the right type of microphone for your recording situation.
- Experiment with different techniques: Finally, don’t be afraid to experiment with different techniques to find what works best for you. You may need to try different room configurations, equipment placements, or even different types of microphones to achieve the best results. With a little creativity and experimentation, you can optimize your recording environment and achieve high-quality audio recordings on a budget.
Use professional software
Choosing the right software is crucial to achieving high-quality audio recordings. Here are some factors to consider when selecting professional software for your home recording studio:
- Compatibility: Ensure that the software you choose is compatible with your computer’s operating system and any hardware you plan to use.
- Features: Look for software that offers a wide range of features, such as multi-track recording, editing tools, and effects processing.
- Ease of use: Choose software that is user-friendly and easy to navigate, even for those with limited technical experience.
- Price: Consider your budget when selecting software, as some options can be expensive. However, there are also many free and affordable options available.
Some popular professional software options for home recording studios include:
- Ableton Live
- Pro Tools
- Logic Pro
- Cubase
- FL Studio
Remember, the right software for you will depend on your specific needs and preferences, so it’s important to do your research and test out different options before making a final decision.
Edit and mix your recordings
To create professional-sounding recordings, it’s essential to edit and mix your tracks properly. Here are some tips to help you get started:
- Use a Digital Audio Workstation (DAW)
A DAW is software that allows you to record, edit, and mix audio. Popular options include Pro Tools, Ableton Live, and Logic Pro X. Choose a DAW that fits your budget and skill level. - Edit out mistakes
It’s inevitable that you’ll make mistakes during a recording session. To ensure a clean final product, it’s important to edit out any mistakes or unwanted parts of a track. Use tools like crossfades, fade ins/outs, and trimming to remove unwanted sections of audio. - Add effects and processors
Adding effects like reverb, delay, and compression can enhance the sound of your recordings. Use these tools sparingly, as too much processing can negatively impact the quality of your audio. Experiment with different settings to find the right balance for your tracks. - Mix multiple tracks
Once you’ve recorded and edited your tracks, it’s time to mix them together. Start by balancing the levels of each instrument or vocal, then adjust for EQ and compression. Listen carefully to each track to ensure that they blend well together. - Use headphones for mixing
Listening to your mix on headphones can help you identify problems that you might not hear on speakers. Look for headphones with a flat frequency response for the most accurate listening experience. - Get feedback
After you’ve mixed your tracks, it’s important to get feedback from others. Play your recordings for friends or family members and ask for their opinions. This can help you identify areas that need improvement and make adjustments to your mixing techniques.
By following these tips, you can edit and mix your recordings to create high-quality audio that sounds professional.
Additional resources
There are a variety of resources available to help you set up and optimize your home recording studio on a budget. Some useful resources include:
- Online forums and communities: There are many online forums and communities dedicated to home recording and music production. These can be a great resource for learning about equipment, techniques, and software, as well as getting advice from experienced recording professionals.
- YouTube tutorials: There are countless YouTube tutorials that cover a wide range of topics related to home recording and music production. These can be a great way to learn new techniques and get ideas for how to set up your studio.
- Equipment reviews and comparisons: There are many websites and resources that provide reviews and comparisons of different recording equipment, such as microphones, audio interfaces, and headphones. These can be helpful when deciding which equipment to invest in for your studio.
- Software tutorials and plugins: Many recording software programs, such as Ableton Live and Pro Tools, have extensive documentation and tutorials available online. Additionally, there are many third-party plugins and virtual instruments that can be used to enhance your recordings. Learning how to use these effectively can greatly improve the quality of your recordings.
FAQs
1. What equipment do I need to set up a home recording studio on a budget?
Setting up a home recording studio on a budget requires some essential equipment, including a computer or laptop, a digital audio workstation (DAW) software, a microphone, and headphones. You can also consider investing in additional equipment such as a MIDI controller, audio interface, and studio monitors.
2. How much does it cost to set up a home recording studio?
The cost of setting up a home recording studio can vary depending on the quality of equipment you choose. You can set up a basic home recording studio for as little as a few hundred dollars, while a more advanced setup can cost several thousand dollars. It’s important to prioritize your needs and budget when selecting equipment.
3. What type of microphone should I use for my home recording studio?
When choosing a microphone for your home recording studio, it’s important to consider your budget and the type of recording you’ll be doing. Condenser microphones are a popular choice for home recording studios, as they are versatile and provide high-quality sound. Large-diaphragm condenser microphones are also a good option for vocal recordings.
4. Can I use headphones for mixing and mastering in my home recording studio?
Yes, headphones can be used for mixing and mastering in a home recording studio. Studio monitors are preferred for their accurate sound reproduction, but headphones can provide a more portable and cost-effective option. It’s important to choose a pair of headphones that provides a flat frequency response for accurate mixing and mastering.
5. How do I choose the right DAW software for my home recording studio?
When choosing a DAW (digital audio workstation) software for your home recording studio, it’s important to consider your needs and budget. Some popular DAW software options include Ableton Live, Logic Pro, and Pro Tools. You can try out different software options to find the one that best suits your needs and workflow.
6. Can I use a laptop or computer for my home recording studio?
Yes, a laptop or computer can be used for a home recording studio. It’s important to choose a computer with a fast processor and enough RAM to handle recording and processing audio. You may also want to consider investing in an external hard drive to store your recordings.
7. How do I set up my home recording studio for optimal sound quality?
To set up your home recording studio for optimal sound quality, it’s important to choose a quiet room with minimal echo and background noise. You should also consider acoustic treatment options such as soundproofing and adding absorption materials to the walls and ceiling. Additionally, investing in high-quality equipment and properly setting up your microphone and headphones can also improve sound quality.
